Oh my, pecan pie

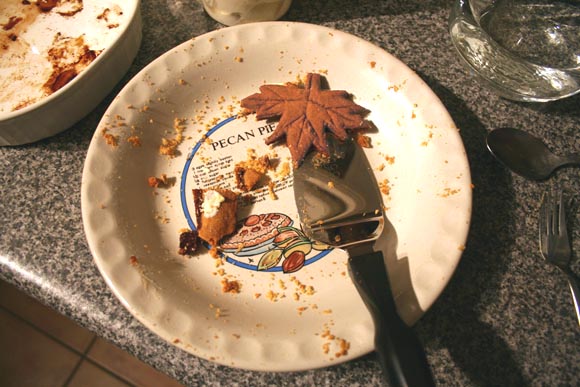
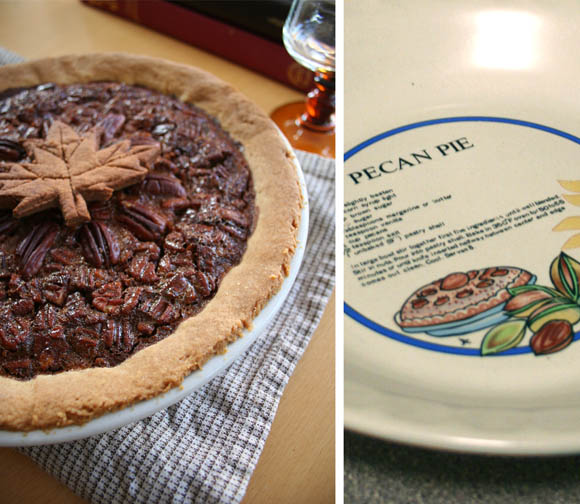
We celebrated Canadian Thanksgiving a week late this year, but it was still a gastronomic success. Turkey, stuffing, sprouts, and a good dose of wine, our Thanksgiving was complete. What I brought to the table was this little dish – one that we haven’t had in 7 years – pecan pie. And it was a delight, if I may say. I made a little maple leaf to match the season and occasion and placed it on top {I baked it separately on a baking tray, otherwise it would go soggy}. 

This is the most straight forward recipe – hand on heart. It takes about 4 minutes to make the filling. God bless simplyrecipes.com
If you’re feeling extra cheeky, serve with whipped cream with a splash of maple syrup. In case you didn’t ingest enough sugar. To die for. Recipe details after the jump. 

Ingredients
1 recipe for pie crust base – I found a really good one here
1 1/4 cups pecans, roughly chopped {save some whole pecans for decoration}
2 eggs, lightly beaten
1 cup light corn syrup (I used Lyle’s brand)
1/4 cup brown sugar
1 tbsp molasses {I couldn’t find any, so I just used a touch more corn syrup}
2 tbsp melted butter
2 tbsp flour
1/4 tsp salt
1 tsp vanilla

Method
Blind bake your pie base for 10 minutes. Spread the chopped pecans over the base. Mix the remaining ingredients, and pour over the pecans, which will rise to the surface. Place your decorative pecans on top. Don’t worry, they won’t sink. Cook for 45 minutes at 180C. Keep an eye on the pastry for the final 10 – 15 minutes. If it’s getting too overcooked, turn the temperature down.

Remove from the oven and allow to cool completely before serving with or without ‘sugar-induced-coma’ maple whipped cream. Mmm.
Click here for a handy cooking calculator, should you prefer to measure in cups, mls, oz, etc.

I want it now – fine bone china

Yesterday morning while I was catching up on my blog feed, I came across something that caught my breath. You know, that moment you see something truly amazing, and your heart kind of stops for a second, you take a sharp intake of breath, and you freeze for a moment? Well I had that kind of a moment when I saw Melody Rose’s stall at the 1st Ever Renegade Craft Fair – London post on poppytalk
I don’t want these. I need them. 
I really have to refrain from including every image. They are all amazing and sum up exactly what I love – a strong contrast between old and new, delicate and hard core. I’m thinking, wedding registry? Hell yes.
Images borrowed from Melody Rose’s website and Facebook fan page

Caddy-up, partner

They say the best things in life are free. During an office clear out, one of the guys I work with walked up to me and said “Hey, this looks like something you could use”. Before I had a chance to reply with a smart-ass remark, it actually was something I could use …

For the sake of my story, turn the clocks back 24 hours. I saw this post from <3elycia which showed a super cute ‘yarn caddy’. I was curious as to what this magical contraption was. As many of you probably already know, it’s a device used to store your ball of yarn to prevent it from bouncing all over the place. I then found a few caddy tutorials online, but I was missing the main ingredient – an appropriately  large container. Turn the clocks forward one day, and co-worker hands me said necessary item. These coincidences boggle my little mind sometimes.

What you’ll need : some sort of medium / large lidded container, a hammer, a nail and screwdriver bit, and a corner or a tool box {see what I mean below} … Since this has a tin lid, I used a nail and hammer. If you’re using a plastic container, you might need to drill through it.

Place the lid upside down* on the corner of an open box with enough support and space below. I did this so I didn’t accidentally hammer the lid directly onto a flat surface. I started with the nail to make a guide indent for the screwdriver piece. I then used a screwdriver piece since it makes a wide enough hole to feed your yarn through the lid. You won’t be hammering with excessive force, so the screwdriver piece won’t be ruined in any way.

That’s it really. No ground breaking DIY skills necessary. But it’s been an immense help with keeping small furry paws away from my yarn stash, as well as keeping my yarn from running away under the couch.

*You’ll need to make the hole from the inside out / using the lid upside down. This way, when you’re using the caddy and pulling yarn out of it, it runs smoothly and doesn’t snag on any imperfections.