Thrifty things – bust must plus

I struck charity shop gold again this week. For some time I’ve wanted something nifty and a little out of the ordinary to display my favourite necklaces. I had seen busts being used all over the internet machine for this very reason, and I wanted in on some of that action. Since I’m cheap as hell, I casually kept my options open for sourcing a sturdy bust perfect for the job. I dropped into Second Abbey {where I found my new / old footstool}, and there he was. Mozart. At the time I wasn’t able to bring him home, so I figured if he was there the next time, I’d buy him. Lo and behold, the next time I ventured in, he was still there. Lonely amidst the chaos …

The poor guy looked like he had been massacred by fake tan. His face says it all. For a steal at €15, I took him under my wing {actually, I placed him in my bike basket}, and cycled home. A little scrub behind the ears and a fresh coat of Montana’s ‘sh. white‘ spray paint, and Mozart regained a little bit of his former dignity. That is, until I draped him in jewels. 
Mozzy, as I now refer to him, is currently taking first place as the focal point in our bedroom, which I’m slowly but surely revamping bit by bit on a budget. He’s perched on our dresser, which I also recently revamped. I’ll be sharing that little upgrade as soon as I can, so keep your eyes peeled! I just gotta get around to taking some decent ‘after’ pictures. 

Chin up, buttercup.

xx A

Also featured – our living room painting

DIY Friday – Scrabble monogram

This is one of those projects I’ve had on my brain for a long time. So long in fact, that I drafted a blog post for it on the 25th of September … 2011. I just never got around to actually doing it.
It all stemmed from personalized monograms. I originally was going to do giant cross stitches of our initials, but as you can see, I never did … It happens to the best of us, right? So, recently I realized I had the right project in mind, but maybe not in the right medium. And then it hit me one day like a baseball to the face – giant Scrabble tiles. 

It was on like Donkey Kong. I was so excited to start. First, I was confronted with what wood to use. My dad {from this point forward shall be referred to as ‘The Expert‘} suggested using ash or beech. Which are beautiful woods, but as we found out, you can only buy them in 8 foot planks. Eh … No. We looked at cheaper cuts of wood, but I was put off by the chicken-fat-yellow hue to them. It was looking a bit bleak until there staring us straight in the face was MDF. It was  perfect – a consistent, Scrabbly colour, didn’t have knots, I didn’t have to stain it and the price was perfect. €15 in Woodie’s DIY for all of this …
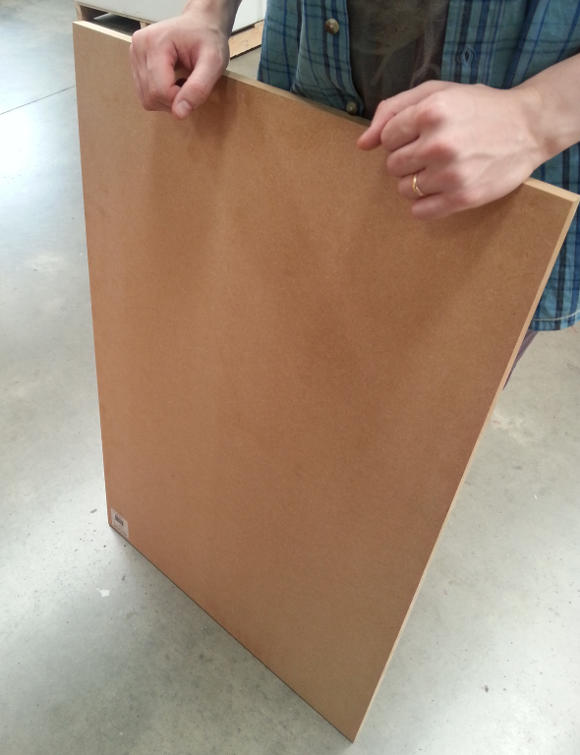
I decided on 25cm x 25cm sized Scrabble tiles. This is where I would love to take full credit, but cannot. Handyman father {aka, The Expert} stepped in. He measured and cut said massive piece of MDF to size and sanded down the edges {so I wouldn’t end up function-less and alone in an attic like Edward Scissorhands}. Then I got my hands on these pretties. Here are this weeks DIY Friday deets … 
What you’ll need – MDF to whatever size you choose, a handyman or saw to cut said wood, graph paper, a pencil, ruler, marker, chalk, tape, eraser, black paint, and small paint brush. 
Step 1 – cut as many pieces of MDF as you like into squares to the size of your choosing. I decided on 25cm x 25cm as a good, solid size. I don’t need to tell you to be careful and wear appropriate eye protection and a mask, right? Good. Step 2 – on your graph paper, roughly sketch out your letter {and number – don’t forget the number!} with a pencil. When you’re happy with the shape of your letter, go over it with marker. 

Step 3 – once I had my letters drawn, I used a ruler and a red pen to mark out the centre of the letters – ignore the numbers in this bit. A Scrabble tile is centred by the letter, and the number is secondary. 

Step 4 – using a piece of chalk, shade the reverse side of your graph paper where the letter and number is. Step 5 – using the ruler on your tile, measure and lightly mark with the pencil the middle point along each edge of your tile. This sounds excessive, but you will be lining up each of the lines to ensure your letter is centred on the tile {as seen in Step 6}. Step 6 – using the red lines and pencil marks on the tile as a guide, centre your letter and tape it into place. 

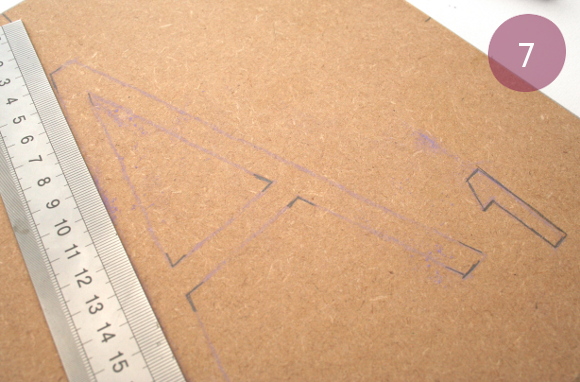
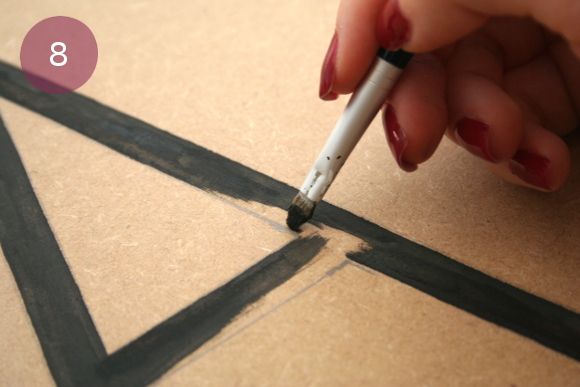
Step 7 – using your pencil, draw over your marker lines. By doing this you are transferring a chalk outline onto your tile, leaving all the measuring, erasing, and guestimating on the paper. You can barely see it in the photo above, but a purple outline is left. I then traced that with pencil before the next step. Step 8 – do what your mama told ya and colour between the lines. I actually use a makeup brush when painting things as detailed as this, as I find the bristles are finer and steadier. Once you’re happy with your painted letters, gently erase the pencil lines, et voila! You have yourself a massive Scrabble monogram … 
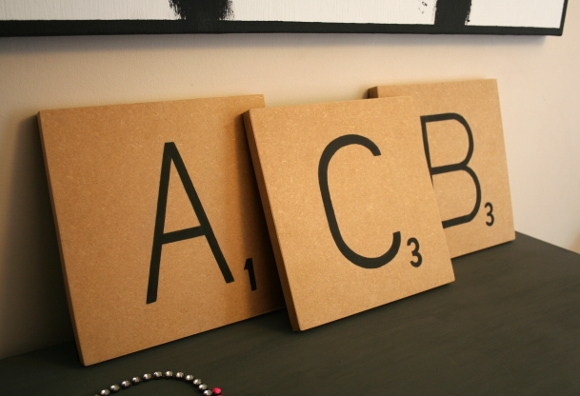
Interesting note: when doing a couple’s monogram, the female’s first initial comes first, followed by the couple’s last initial second, and last, the male’s first initial. So in our case, it’s ‘A C B’. And yes. Our combined initials are the first three letters of the alphabet. And in true Scrabble form, the addition of all three letters = 7, my favourite number. I geeked out a little over that one. It’s like it’s meant to be {barf}.
I hope you have a super fabulous weekend lined up internet friends! I have not one, but two parties to attend tonight. So I’m afraid I must dash as I have yet to put my face on … Might have to get the saw out again. xx A

p.s. Massive thank you again dad for helping me out. This DIY wouldn’t have been done without you 🙂

DIY Friday – fancy footstool

I am so excited to reveal this weeks DIY Friday! It’s something I’ve wanted for a lawng time – my own little footstool. You see, I am lacking in the leg department and when I sit on a normal chair / couch, my legs dangle = tres embarrassment. For a normal person this won’t seem like a bit deal, but if I sit with said legs dangling for an extended period of time, I get insane leg cramps and that can’t be good. I know I sound like a prood, but I’ve wanted a little footstool for a really long time now, and thank the baby jesus, I found one!
I spotted an adorable square footstool in Oxfam a couple weeks ago, but I did the worst thing possible – I hesitated to buy it. That was major dumbness because of course, someone bought it the next day. I had a massive sad, but was determined to find another. 
Last weekend hubby told me of a new charity shop he found and was excited to show me. We checked out Second Abbey {so new that it doesn’t have a website}, and there was my future footstool. Sitting in the window. This sad little beige bundle of wonderfulness was looking for love. And I made sure to not leave without it. 

I brought it home and immediately got to work on it. Here is what you’ll need should you like to fancy-up a footstool of your own …
What you’ll need – enough fabric to cover your footstool {I used two different fabrics to make it a little fancier}, trimmings for the top seam and bottom {I picked mine up from Home Focus at Hickeys}, paper and a marker for making a template, scissors, stapler, a needle, matching thread, pins and a some patience. 
Step 1 – find the right combination of fabrics and trimmings to cover your footstool. I used a tough and durable fabric on top and a softer somewhat glitzsy fabric on the sides {both were fabric I had in my ammunition already}. I tried pinning loads of different combinations of fabrics in different sections, and this was the combo I immediately adored.

Step 2 – I trimmed all the unnecessary bits off the existing footstool. This puppy was in serious need of a haircut. I should point out that I wasn’t confident enough to take the existing fabric off – my sewing skills are not that good {yet}, and this was my first reupholstering gig so the shape the existing fabric held helped a lot. Step 3 – turn your footstool over and trace it onto a piece of paper to make a template. You’ll need this to shape the top piece of fabric. 

Step 4 – use your paper template to draw onto your top piece of fabric. It was around this time that I was seriously doubting my oval sewing skills. Step 5 – pin together your side fabric {in this case, my glitzy fabric} and your top trimming. Sew snugly all the way around {I’ve indicated my sew line in purple} until you have enough to cover the body of your footstool. 

I was constantly fitting it onto the footstool as I went along to make sure I was on track at all times. You can see this in the picture above. Fits like a glove. Step 6 – I will try my best not to confuse the hell out of you with this next step. Take your oval fabric template and pin it to the inside of the black trim that your side fabric is sewn to. Both pieces will be inside out for this step. Align your marker line with your trim and pin in place. You will be sewing along the same line as step 5, but along the inside/marker line in order to sew the top into place. Have I lost you completely? Oh god I hope my pictures make more sense than my mouth. 

When you’re finished sewing all the way around, turn it right-side-out, and the worst will be over! It’s a lot easier than it looks and it’s most definitely mind over matter. Please keep in mind I’m neither a good or experienced sower.

Keep checking your cover by placing it on your footstool ad nauseum. That’s what I did and it ended up snug as a bug. Seriously, if I can get to this point, anyone can …

Step 7 – flip your footstool over, pull the fabric tight and staple it in place. Don’t worry about it being perfect. Remember that this is something that will be viewed from above, so any lumps and bumps underneath won’t be seen. Unless you have incredibly nosy house guests. In that case, pour yourself a G&T. Step 8 – pin your finishing trim of your choice along the base of the footstool. I very simply sewed along the top of the trim to secure it to the footstool. NOTE: it is important to sew the trim at this point and not earlier – if you were to sew the bauble trim onto the fabric at an earlier stage, when you stretch the fabric to be stapled, you may end up with a wonkey / uneven trim along the base. By sewing the trim on at the end, you are ensuring it’s being sewn on in a straight line.

And there you have it! Your very own little bespoke footstool. I really hope all of that made sense and wasn’t too wordy. 
I really enjoyed working on this piece as I went way outside of my comfort zone by having to sew in an oval shape. I’m quite proud of my little footstool and foresee a lot of desk comfort from now on. I’ve been working on my desk space as well, so there will be another little reveal coming soon where you can see both matching lamp and footstool rocking it together. 
And for those of you who guessed correctly at this weeks DIY Friday sneak peek – gold stars all around. I have such creative internet friends. Happy Friday all, and see you on the other side 🙂 xx A