Ten minute morning tidy

While I’m chasing my field of interiors dreams, I work an office job by day during the week. I wake up early, feed the cats, apply my face, get dressed, make a lunch, but one thing that will always be part of my morning routine before I go to work is that I set aside 10 minutes to tidy our apartment. 

I know a large number of you are currently recoiling at the thought of it and serving up some serious stink-eye. Something along the lines of this comes to mind … 

But today I’m going to convince you that yes, you do have time fo dat. And it will surprisingly make your day so much easier. And here is my one reason to convince you –
  • If you spend 10 minutes tidying your home in the morning, when you get home in the evening, exhausted from work, you will be walking into an already tidy home. More time for dinner, more time shooting the breeze with your spouse, more time chillaxing. The less chaotic your surroundings are, the more calm your mind is and the better quality your home life will be. 

Have I convinced you? Good. Here are my tips for the 3 main areas of your home that you should consider for your ten minute morning tidy … 
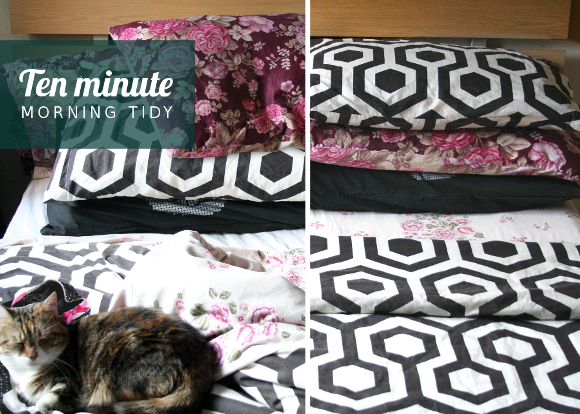
BEDROOM

My first real job when I was a teenager was working as a housekeeper in a Travelodge Hotel a stones throw from home. I learned not only how to change and make a bed in under 2 minutes, but the importance of a tidy bed. Your bed is the biggest thing in your room and the first thing you see when you walk into your bedroom. If it’s chaos, your room is chaos. It doesn’t have to be made perfectly, just a couple seconds of effort to straighten your bed sheets.
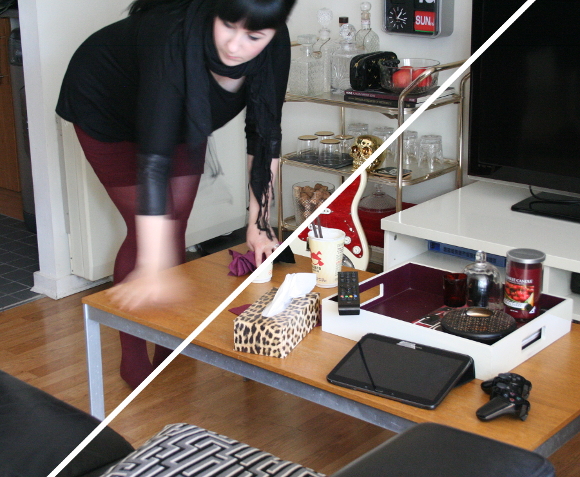
LIVING ROOM

Our living room is the heart of our home and therefore the quickest to fill with junk. It’s the messiest room so I’ll spend the most time tidying it. Still, I only allow myself 5 minutes, otherwise I’d never leave the house. I start off by putting the living room items back where they should go – tablet goes on our desk, the PS3 remote goes into the PS3 / husband accessories drawer, any notebooks go back onto our shelves etc. Anything that needs to go into the kitchen gets put on the counter and anything that needs to go elsewhere in our home I put in our chuck it bucket. Don’t waste time by running into every room of your house. 

We’re at a good place now as I’ve been avidly downsizing, organizing what we have and working on giving all our stuff its own place. A home for everything and everything has a home. If you need a bit of inspiration to get you started you can check out my 5 decluttering tips or my less 365 mission. 
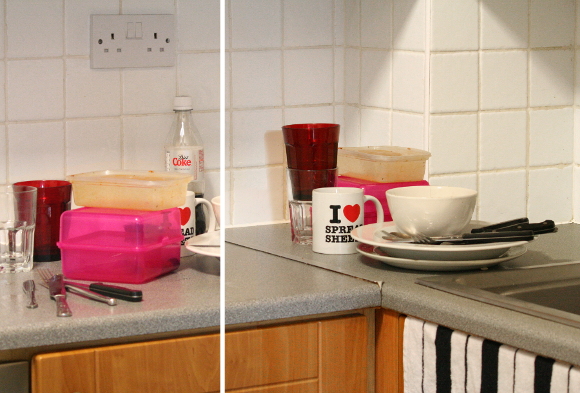
KITCHEN

There’s nothing I despise more than doing the dishes. We’re not blessed with having a dishwasher in our apartment so we have to clean our dishes old school style. And because of this, there are always dishes haunting our kitchen counters. Let me get one thing straight, I do not clean dishes in the morning [that’s were I say ain’t nobody got time for dat]. I like to think of our kitchen as in a constant state of contained chaos. I stuff things in the recycling where necessary and stack all the dishes in the corner by the sink so they’re not all over the counter, where they patiently wait for my husband to come home and wash them. 

But for those of you who have the luxury of owning a dishwasher? Bend over and I’ll show you where you can put your dishes. You have no excuse.

xx A

New project – #OfficeKitchenMakeover

I’m taking a note out of Christine Dovey‘s book and coining a hashtag if you will for my newest project, project #OfficeKitchenMakeover! 
I’ve mentioned a couple times before that during the day I’m an office zombie – an office administrator / personal assistant in the Dublin city centre, to be more precise. While I was working last week, an opportunity arose for me to put my design ‘skills’ to good use. Our office is looking to give the kitchen canteen a mini face lift, and I was asked if I’d like to help tackle the job. Well if you’re going to twist my arm! 
Our office kitchen is a run-of-the-mill canteen. Magnolia walls, greyish-blue lino flooring, builders cabinets, and more mismatched plates and chairs than we know what to do with. It’s tempting to look at Pinterest for inspiration, but as there’s a tight budget, I’ll be focusing mainly on two areas – the walls, and making the storage work. 
In stead of fighting the blue floors, I’ll be embracing it and pairing it with washed out mink purple and black and white. Our office already uses Viking Direct for their office supplies, so I’ll be sourcing most of our items from there. And as it turns out, they have some, dare I say, on trend stuff. Those chairs? Yep. 

THE WALLS

I’m hoping to repaint the walls white to brighten the room since it gets no natural sunlight. Then I’m hoping to add some serious oompf by spray painting a quote on the wall, along the lines of what I did for the Localise Youth Room at Sophia House. Our office deals with sensitive issues with members of the public, so for the sake of my blog post, I chose a strong {and one of my favourite} Dolly Parton quotes as an example. Plus, it rains here in Ireland a lot so we can relate to it literally as well. I’d also like to add a pegboard section to one wall where we can keep all the odd shaped items which at the moment are being crammed into cupboards, patiently waiting to fall on you the moment they’re opened. 
THE STORAGE
I can’t wait to put my decluttering skills {I say that like it’s a real thing} to the test and make the most of the storage we have. Our office kitchen is like any kitchen – everything needs to be taken out of the cupboards, ruthlessly downsized, and put back in a place that makes more sense. And to ensure everyone is on the same page going forward, I’m hoping to label the inside of the cupboards {Mrs. Doubtfire style}. I did something similar using a Dymo machine with the stationery cupboard before Christmas, which has remained relatively civilized since {shock, horror}. So fingers crossed my neat-freakery will be welcomed with open arms in the kitchen. 

1. Graffiti wall quote, painted in the same fashion as the quote I painted for the Localise Youth Room at Sophia House
2. 14cent Quartz Heavy Duty Office Wall Clock, €22.49, Viking Direct
3. Transworld Products Preserve Jar, 2ltr, €7.79 each, Viking Direct
4. Linen Cotton Dish Tea Towels Chrysanthemum, €13.40 for a set of 2, ColoredWorld via Etsy
6. Dymo LabelManager LM160P, €38.99, Viking Direct
7. DIY kitchen pegboard, via A Beautiful Mess 
8. Lavandula plant, €8, IKEA 
My next blog post on project #OfficeKitchenMakeover I’m hoping to share some before pictures and a more specific design once it’s finalized. What do you guys think about quotes on office walls? Do you think it works well? Fingers crossed they’re open to the idea of me graffitying one on their walls … Wish me luck! xx A

DIY Friday – chalkboard clipboard

Before I dive into today’s DIY, I want to thank you guys for your words and support regarding Wednesday’s post. I stare at my blog every day, so sometimes I need a kick in the hole to remember how much I have managed to achieve here. At the same time, I’m attempting to step out of my comfort zone and start contacting people about projects. I’m happy at the rate I’m going, but I want to kick it all up a notch. I’d love to get into doing upcycling for reals, one piece at a time. And now I’m rambling. Onto the DIY! 


In June of last year I painted a blackboard shopping list in our kitchen. It was great, served its purpose well, and we get tons of use out of it but I always looked at it and thought it could do with being pimped out just a bit. I had a light bulb moment when I happened to bring my clipboard into the kitchen one day, and thought the marriage of the two would be a perfect focal point in our kitchen. And I will say, a painfully simple DIY … 

I took the above ‘before’ picture yesterday morning before work. It was only when I began editing the photos I realized I hadn’t erased what was on the chalkboard. Great. Toilet cleaner. Don’t panic, you can edit that out on Photoshop. But then I thought no, keep it real. Yes, we need toilet cleaner. If I edit it out, I might forget to get it when we go shopping. Maybe you need to get toilet cleaner this week too? Okay, enough about toilets. Onto the DIY.

What you’ll need – a clipboard, some masking tape, a paint brush, some blackboard paint, a hammer and a nail.

Step 1 – using some masking tape, mark the border for the area you’d like to paint on your clipboard. You can of course throw caution to the wind and paint the whole thing if you’d like. Step 2 – paint that baby good. I applied two light coats of chalkboard paint. Step 3 – before the paint dries, peel off the masking tape. Step 4 – set it aside and allow it to dry, then hang that baby up wherever you like.

Voila, c’est fini! And that is my super simple DIY this week. For the week that it is, I hope you have a safe and eventful St. Patrick’s Day weekend! Monday is a national holiday here in Ireland, and I tell you, I cannot wait to sleep in 3 days in a row. xx A