Autumn Decluttering is the new Spring Cleaning

Over the past few weeks I’ve been on what may be my final mission to declutter our apartment. I’m proud to say that this round has been the most beneficial yet as we’re down to a Goldie Locks level of stuff – not too little, not too much. Our cupboards are just right

I wrote some of my top decluttering tips a couple of springs ago [which I still live and purge by], and this time round I made note of some new tips and tricks during my latest and most ruthless purge. In case you’re also a bit hesitant to start, here are my second round of tips …

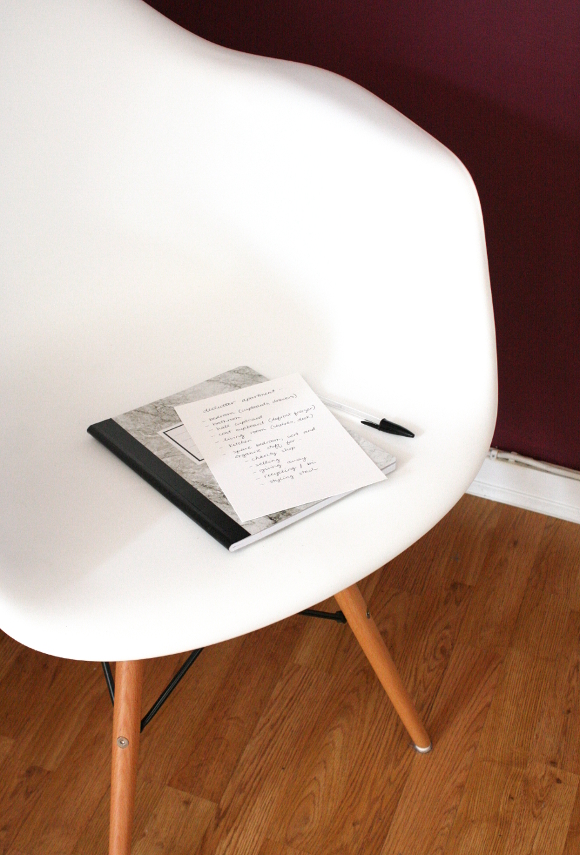
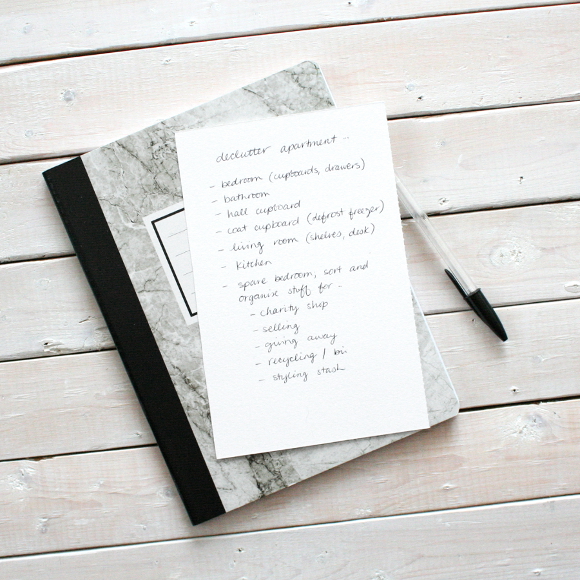
1. Make note of what needs to be done and keep it somewhere visible. For myself, I find the best way is to make a list of each room and the problem area in that room [usually a storage area] to either tackle, purge, organise or tidy. I tackle one item on the list at a time. Don’t overdo it, or you’ll burn out. If I’m feeling particularly energetic after work or if it’s a rainy Saturday morning, I’ll tackle one area on the list.

2. Let the amount of space you have dictate how much you should have. Meaning, if you only have room for [example] 12 mugs in your kitchen cupboard, only keep 12 mugs in your kitchen cupboard. It’s simple. There’s no point in trying to precariously balance 22 mugs in a space suited for 12. If it’s a case that some items are seasonal [ie – Christmas themed mugs], consider packing them away with the rest of your decorations and only bring them out when appropriate.

3. The less you have, the less you need to clean. Continuing from my last point and using the mug example again; the less mugs you have, the less mugs you need to clean. If you have 22 mugs, get really lazy and don’t wash any of them one week, you’re then inundated with mugs to clean. But if you have less, you not only have less but have less of an excuse to go so long between washing them.

4. Put everything you want to donate / recycle / relocate in one place, then tackle that at the end. I used our spare bedroom as a dumping ground while I was purging because I could simply close the door and forget about the chaos. Now that I’m finished, I can barely open the door so it’s high time I sort the contents of our spare room. Mini welp, but it’ll be relatively easy as I can sort through it 20 minutes at a time and close the door on it whenever I get sick of it. 

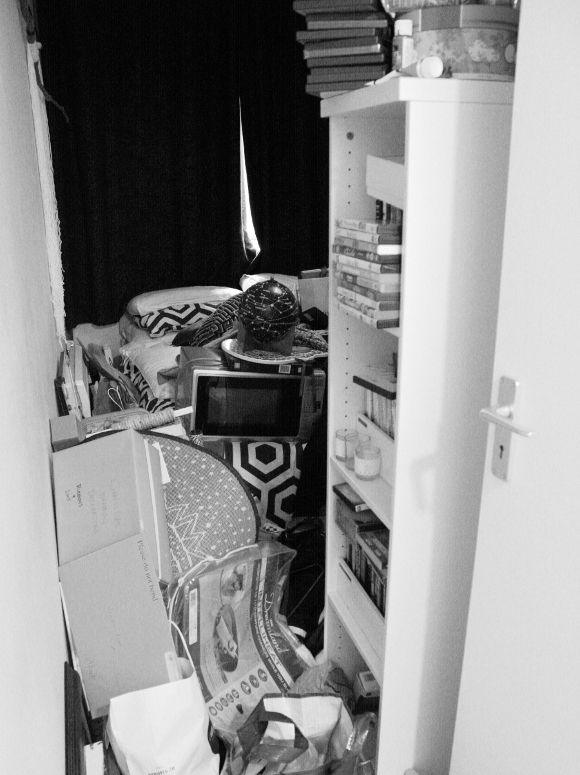
Yes, that’s a microwave on the bed. It, like many things in here are just waiting to be reorganised. 
Not everything is going. #KeepingItReal

5. Don’t expect your home to be purged in a week. That’s straight up not going to happen. If you live in a small apartment like us, give yourself 1 or 2 months, or longer if needs be. Slow and steady wins the race. 
For me, this weekend I’ll be tackling our spare bedroom and organizing what should be donated, rehomed, recycled or relocated. Exciting stuff I know, but I’m a firm believer in the old saying of …

“Tidy desk, tidy mind.”
And that goes for the rest of our home too. I don’t know if any of the above was of help to anyone, but for me I find these along with my original decluttering tips have helped me stay on track and downsize what we have. ‘Cause let’s face it, we all got way too much shit. xx

Kitchen update – reveal!

I’m actually quite excited to at long last share decent photos of our kitchen. For the 6 years we’ve been living here, I’ve rarely taken photos in our kitchen because, well, it was embarrassing. It was a classic case of trying to work around landlord [and builder] stuff and as much as I tried to make it pretty, it just didn’t work. To get you up to speed, you can check out what our kitchen looked like before, and then see the first round of changes I made to our rental kitchen. 

A few weeks ago Harvey Norman got in touch when they read my blog post about our kitchen and very generously offered to give a helping hand with adding some pizzazz to our kitchen. Um, woah. I had worked with Harvey Norman in the past when I was working on the Localise room at Sophia House, and to say they were a huge help is an understatement. They’re an incredibly down to earth group of people behind the name, and they have killer sales. Which is a giant plus. They’re a company I’ve been a fan of for a long time so I was incredibly excited when they got in contact to work with me directly. 

After all my work overhauling the kitchen last Saturday, I rewarded myself the next day by heading to Harvey Norman to accessorise our kitchen in style. And it was tough, I’m not going to lie. Because I wanted ALL OF THE THINGS … 

To the horror of poor husband, I spent almost 2 hours in Harvey Norman Blanchardstown last weekend. For our shelves, I couldn’t resist the sleek pepper mill [which we actually use for sea salt] and a mortar and pestle. Husband is a curry aficionado and has mentioned rather frequently, “hey, remember that mortar and pestle we had 5 years ago? That was nice. Before it smashed“, so Harvey Norman’s sleek porcelain and bamboo mortar and pestle was a must. 

I’m a big fan of mini versions of every day things, so when I spotted their mini shopping baskets, I had to get two. One of which is perfect for eggs. I also spied some mini espresso cups to support husbands caffeine interest. A perfect little black and white accent to our shelves.
I didn’t make any drastic changes to the shelves in our kitchen, I just paid a little more attention to them as they had been lacking some for quite some time, thanks to the yellow door taking the spotlight … 

I think the biggest change I made to our kitchen was removing the microwave. Our kitchen is tiny therefore we have very limited counter space, so removing the microwave gave us SO much more room. We didn’t use the microwave much anyways, so we can simply use the stove or oven to heat whatever we need, old school style. 

In place of the microwave, I created a little hot beverage station for husband. I had had my eye on the DeLonghi Brilliante kettle in black, but it was out of stock when I was visiting Harvey Norman. But to be honest, our old kettle [not pictured] works fine. It’s just ugly as sin and I was over excited at the idea of having a really fancy kettle. I mean look, it’s so angular

Both the tea and coffee boxes I found in charity shops over the years and spray painted in my favourite Montana winegum [the tea box was actually one of the centre pieces in our wedding]. I couldn’t resist picking up another mini shopping basket in Harvey Norman to perfectly keep all husband’s beverage accessories in line. 

Another change I made to the kitchen was that I removed the kitchen-roll-and-tin-foil thing that hung on the wall previously, as we only used it because it was there. To cover the wall studs in its place, I framed and hung one of my favourite food themed graffiti Instagrams. I think it looks much better, no? 

And on the far side of the kitchen, I simplified everything again. I got rid of our 8 year old chopping boards [ew] and replaced them with this bamboo and rubber board from Harvey Norman. It’s been a while since rubber got me this excited. When we’re preparing food, the chopping board doesn’t go all over the place like our previous boards did. It’s such a simple thing, but makes a huge difference with food preparation. 

I also couldn’t resist those giant BBQ matches I rather excitedly found in store. I bought 4 boxes of them, but immediately justified it because, well, look at them! I have more on display in the living room. I also picked up a bamboo bowl for the keys in our hallway and a giant vase that looks kind of like a bomb shell, for our bedroom. Both of which I’ll be sharing along with updates on our hallway and master bedroom. Speaking of which, that room is next to get the paint treatment. More #DIYDominoEffect!

Kitchen update – beforemiddleafter

Disclosure – Harvey Norman generously supplied kitchen accessorise free of charge for my mini kitchen makeover, but of course as always, all words and opinions are my own. I only work with companies I like and of course, think that you will like too! Thank you for supporting the companies that support The Interior DIYer.

Kitchen update – the bones

First up, thank you to everyone who let off steam along with me both online and off in regards to my rental rant last week. I’ve chosen to use my rental rage for good, and so this past weekend I channeled all said rage into bringing our rental kitchen into the 2000’s. It started so innocently on Saturday morning while Robert was asleep. “I’ll just reoganise the cutlery drawer … ” and as I gained momentum, much like Juggernaut, I was unstoppable. I whitened, sanded, scrubbed, stripped and painted our kitchen top to bottom in one day. I’ve got to say, even though I only painted everything white, it has made a world of difference. 
There are bare boned before and afters together below, but if you’d like, you can see a full room tour of what our kitchen looked like before here. Also, please note that our kitchen does not get any natural light, so my photos aren’t as wonderful as I’d like them to be. Yay, florescent lighting …

I started by taking everything off the walls and counter so I was starting with a blank canvas. I then tackled the more finicky task of bleaching the grout along the black splash. I normally clean it with an eco-friendly cleaner, but that never corrected the previous years of neglect [from the previous tenants]. I don’t use bleach unless I have to, so I figured this time wouldn’t hurt and I really had to go in with chemical warfare. I used thick bleach and a toothbrush and scrubbed all the grouting. I washed it off after 30 minutes, but I didn’t see the total effects until about an hour later. The grout came up beautifully. 

The kitchen hadn’t been painted during our time living here. I had white paint leftover from tackling the hallway a couple of months ago, so I got to work and repainted the walls next. That didn’t take long as there isn’t much bare walls. I recharged, then tackled the one thing I had been avoiding for months; the last door. I sanded the kitchen door, frame and skirting boards and painted them WHITE

Can we just have a moment of silence please, in honour of me sanding and painting the FINAL DOOR AND SKIRTING BOARDS IN OUR APARTMENT

I had to take the shelves down in order to open the door and properly paint both sides of it. The shelves will be going back up as we need them for extra storage. It’s a teeny kitchen. I cannot tell you how much I love our kitchen now that it’s not accented with that hot mess of high gloss yellow door.

But stay tuned because on Wednesday I’ll be sharing the fun bit [I think so at least] – the accessorising. I can’t wait to get in there and take a fresh look at our kitchen and reorganise it. Sometimes you just have to start from the beginning again. I picked up some extra goodies over the weekend that I cannot wait to add [and use!]. Woop! 

Kitchen update – beforemiddleafter