Kitschen shelves

Last weekend I spent some long overdue focus on our kitchen. I enjoy silly things like fussing over arranging a display, and sadly our kitchen was lacking this attention. Since I have so many little fecky kitchen things I’d love to show off, cheap shelves were purchased, colour was applied {‘winegum’ spray paint from Montana}, father’s skills and drills were summoned, and kitsch was applied to the kitchen. 
This space had hanging storage already, but it was driving me insane as it never looked tidy. You may have noticed, our shelves are placed up against a door. We haven’t opened said door in 4 years, so this is not a concern {it’s just a secondary entrance to our hallway}. 

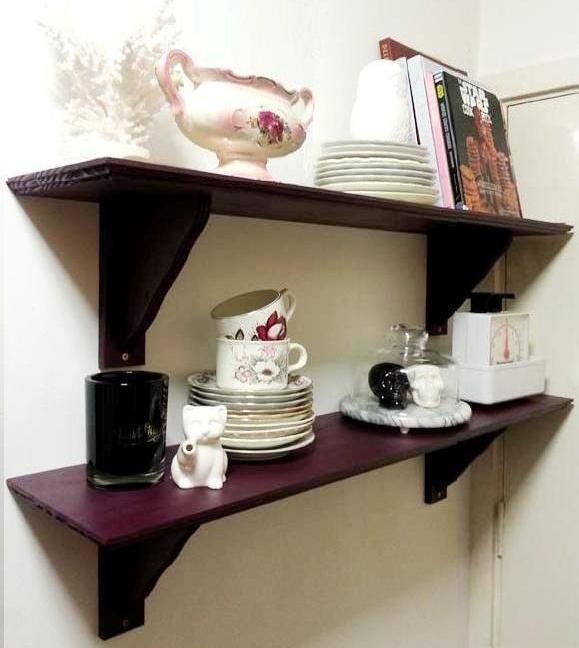
I’m not finished tweaking and rearranging the shelves just yet, but for the moment I’m very happy with how its turned out. I like the balance of old lady / nerdy stuff / old and new mix that’s going on. I’m contemplating adding either a painting above or below, or some action along the lines of bunting / dangly stuff, but I think I’ll let the shelves settle in first. 
xx A
Top shelf – coral {thrifted}, vintage vase {thrifted},  matroyshka measuring cups {ordered online}, tea cup plates {thrifted}, Star Wars Cookbook {ordered online}, other cookbooks {store bought}. Bottom shelf – Marcel Wanders candle {store bought}, milk pourer kitty {gifted}, teacups and saucers {thrifted}, cheese plate {thrifted}, skull salt and pepper shakers {thrifted}, and weighing scales {inherited}.

Living room makeover – painting update

At long last, our canvas is at peace. After my previous attempt, I knew exactly how I wanted to paint it, and finally finished it late last night.

I’ve really enjoyed uncomplicated artwork as of late, so I thought why not magic some up for myself. I wanted it to pop, for it to remain monochromatic, and something artsy fartsy yet simple going on in the middle. I also chose to hang it up compared to it previously sitting on our shelf, which I think has made a huge difference. 

At the moment I’m conscious of it looking a bit pretentious. But I’m really, really happy with it this time around, so that’s trumping my hesitations. 

And below, the ‘work’ I had done on it previously. I felt a whole mess of guilt painting over it at first thanks to your incredibly sweet and thoughtful comments, but for me, it’s previous state made me want to barf a little I felt wasn’t to its full potential. 

I finished painting late last night, and when husband saw it this morning all I heard was “Woah. That looks a lot better” from down the hallway. Happy face.

I hope you guys had a relaxing and / or refreshing weekend! It’ll be Mothers Day on Sunday here in Ireland so I’m determined for no last minute malarky this year. I have a couple tricks up my sleeve … 

xx A

From skirt to pillow

Here’s a pillow cover tutorial that will have you keeping your eyes peeled for discounted skirts …

I bought this skirt three years ago because – 

   a) I liked the colour.
   b) I really liked all the rouching it had going on.
   c) It was velvety and I like velvet.
   d) It was on sale for €1. Hells yes.

Too bad I never tried on said skirt before purchasing it. It fits, but it’s a bit disastrous. So, the reason I upcycled this skirt is – 
   a) I really adore the fabric so I’m not ready to part with it. Yes, it was dirt cheap, but I think it would make a fabulous pillow.
    b) When wearing this skirt, this particular fabric makes my thighs look like two sea lions fighting on a beach. Hand me the scissors.

What you’ll need : a skirt you no longer wear {or a super-cheap one you spot on sale}*, a pillow the same size or slightly smaller than your skirt, scissors, a needle and thread – or if you’re fancy, a sewing machine. Alas, I do not have one. Woe is me.

* This really only works if your skirt is the same width from top to bottom – i.e. a pencil skirt of sorts.

Step 1 : turn the skirt inside-out. Sew across the top leaving a bit of space from the edge. This particular skirt had an elasticated waist, which I cut off before sewing.


Step 2 : turn the skirt right-side out, and stuff with a pillow. From here, you can gauge if the sides need to be taken in a bit to better fit the pillow. If they do, turn your skirt inside-out again, and sew where necessary. Step 3 : once the pillow snugly fits inside the skirt, turn it right-side-out, stuff pillow inside, and sew the pillow closed using a ladder stitch. There is the option to sew  this opening a third of the way closed from either side while your skirt is still inside-out and has no pillow in it. This gives a cleaner line on the outside, and once you feed the pillow through the remaining opening, it means you have less of a ladder stitch to do.

Et voila! This will hopefully feed my pillow obsession for the next week or so. And I hope I’ve otherwise saved some skirts from the skip 🙂

p.s. It was complete coincidence that I paired skirt / pillow with black and white stripes in both the before and after pictures. I nerded out over that a little once I noticed it. Because I’m big time lame.