I’ve wanted a feature lighting pendant for some time for our dining nook. Any of the beautiful pendants I’ve seen have unfortunately been outside of a reasonable price, so the opportunity arose for me to come up with a little something of my own. Here is what I cooked up:
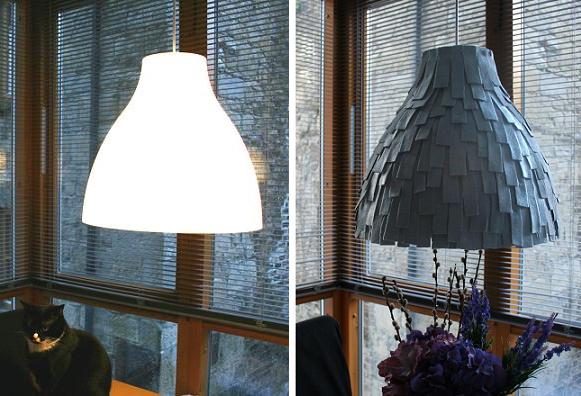
There was no better place to start than beloved IKEA for a basic pendent shape. I chose the 180cm x 38cm Melodi pendant lamp, as I wanted a sleek shape to juxtapose the surrounding sharp lines on my dining room. My fabric of choice was a lovely stone grey felt.
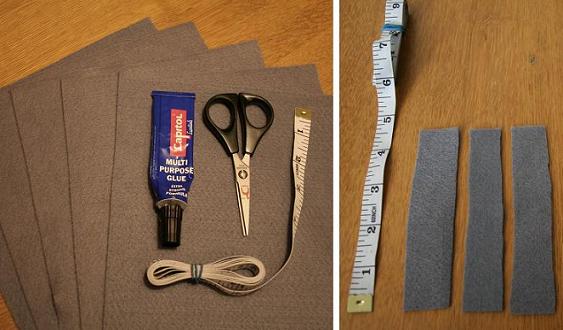
Materials used
– One IKEA Melodi pendant lamp
– Felt sheets {I used roughly 8, at €0.72 per sheet}
– Glue/adhesive
– Scissors
– Measuring tape {not necessary}
– A steady hand and a good eye for cutting straightish lines
I began by cutting the felt into 1×5 inch strips | by cutting the felt rectangle into vertical strips, then cutting the vertical strips in half. Pretty easy, but you can choose whatever length or shape you like.
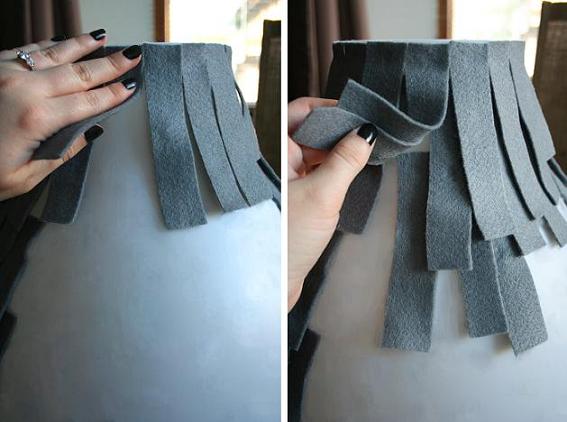
I started at the top of the Melodi lamp, and using a small dab of glue at the end of each piece, I placed the felt evenly around the top of the lamp. For the remainder of the lamp, there is no right or wrong method to placing each piece of felt. I continued to dab glue to the end of each piece, and placed them underneath the felt above, making sure to underlap {as opposed to overlap} to cover the exposed Melodi lamp.
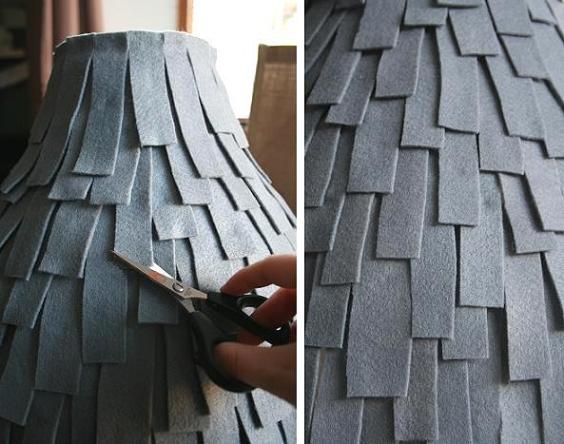
Not to make it too repetitive, I decided to stagger the lengths of the felt. I simply did this by gluing the felt, and then trimming it to varying lengths where I saw fit. Don’t be afraid to hack into it. I continued this process until no parts of the original lamp were visible. The entire process took two evenings {an after work job}, accompanied by some decent tv.

Please note | in our dining area, 3 out of 4 walls are floor to ceiling windows, therefore the light I have placed is strictly ambient and decorative lighting. This area already gets a generous amount of light. Be careful should you tackle a fixture like this of your own, that it is not for task lighting {ie reading, chopping, etc}, as this level of light would not be appropriate and will strain your eyes.
I hope to have inspired some of you to get out there and make something of your own. It’s so simple, and can be as straight forward as you allow it to be. And more importantly, enjoy crafting!
Additional note | check out the IKEA Hackers site to see my Meddling with Melodi mention. Warm fuzzy feelings.