DIY Friday – holiday memory boxes

Back in June I had a chance to sit down and chat with the lovely Sarah from Organised Chaos for Image Interiors & Living. I can’t spill the beans on everything we spoke about [you’ll have to check out the September / October issue that comes out in two weeks, woop!]. I immediately felt at ease chatting with Sarah about a whole spectrum of organising and decluttering. In fact I may have gotten a tad over zealous. After all, it’s not every day I can talk so openly and excitedly to someone about hangers for 10 minutes without them giving me stink eye in return. 

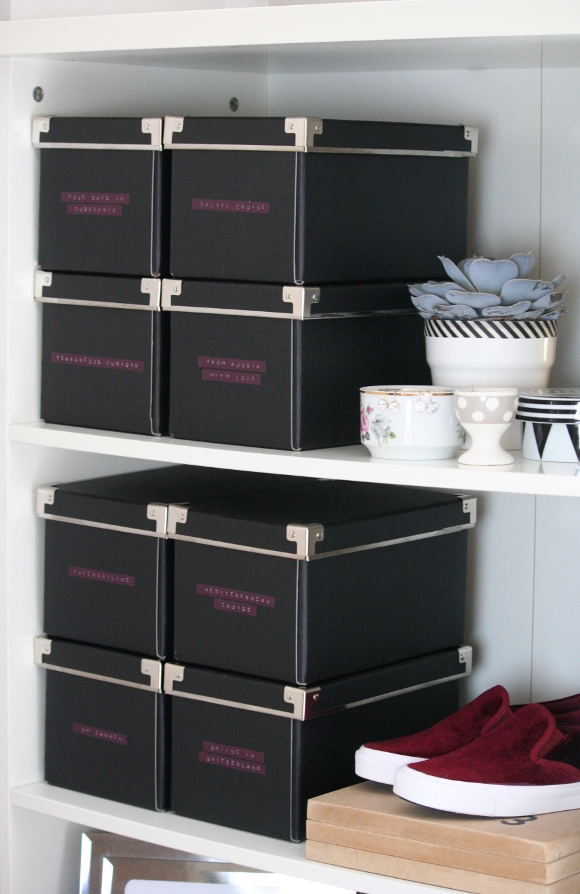
One storage solution Sarah mentioned briefly during out chat was her holiday memory boxes – she suggested people invest in pretty boxes to put their holiday souvenirs, trinkets, and memories into. It’s a great way to keep your ticket stubs, sea shells, and maps from eating into your everyday storage and tumble-weeding around your house as well as giving them a defined space. I thought this idea was phenomenal. Husband and I have done quite a bit of travelling over the past couple of years [23 countries, to be exact], and not to mention I’m a bit of a memory hoarder. Bus tickets, metro tokens and the likes. Since June I couldn’t stop thinking about Sarah’s holiday boxes, so I couldn’t resist making her brilliant idea into this week’s DIY Friday …

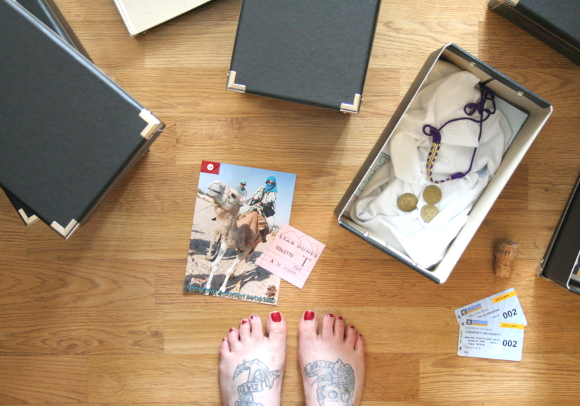
First up, I’d suggest assessing how much you have that needs to be stored. There’s not much point in going out and buying boxes first, then realizing they’re too small for the souvenirs you have. So what I did was spread out all my travel souvenirs then hit the IKEA website. I didn’t want anything too naff, but at the same time, they’d essentially just be storage boxes so I didn’t want to pay too much. Affordable and easy on the eyes. 

It didn’t take long before I saw the black KASSETT lidded storage boxes, and at €2.25 for two boxes [yeah, that’s €1.12 per box], I’d be crazy not to. They were the perfect size, 26cm long x 16cm wide, aka the size of an A4 page folded in half. Perfection. Bus. IKEA. Bus. Assembly in front of the TV.

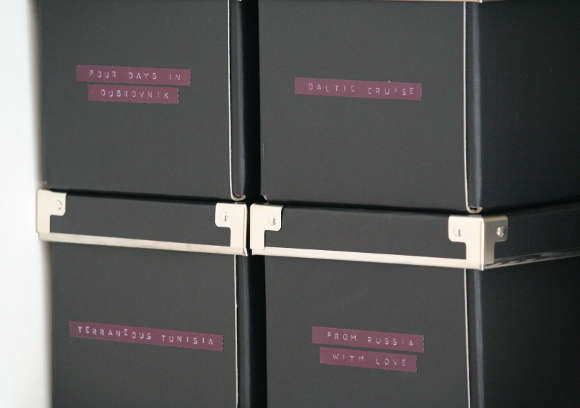
I wasn’t in love with the label tabs that came with the KASSETT boxes, and I was also dying to put my Dymo Omega label maker to good use. But my label tape is black, and my new boxes are black, so they won’t stand out! Talk about first world problems. So what did I do? I spray painted the label tape with my go-to Montana paint in ‘winegum’, punched out the words, then lightly sanded the letters to bring up the white lettering. Bingo. Bespoke labels. 
[PRO TIP – the shiny label tape works best vs. the mat label tape]. 

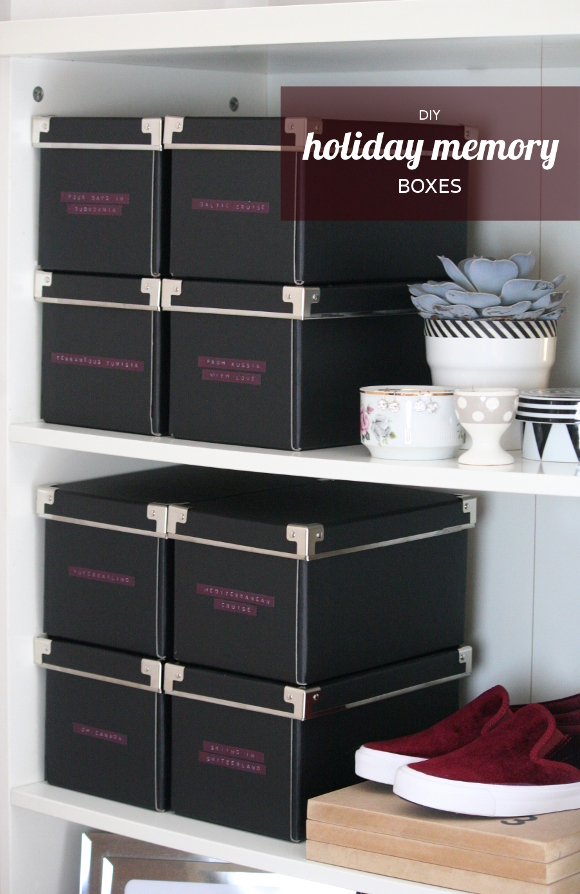
Sarah suggested storing the holiday memory boxes in a neglected shelving area in your home. To help beautify the space as well as make use of an otherwise neglected storage area. For the moment I have our holiday memory boxes on the shelves in our bedroom, but that won’t be their final destination. 
All hail Organisation Expert Sarah.

The man with no manager

I don’t even remember how I heard about it, but at the end of March husband and I attended the Bill Murray: Chasing the White Whale OFFSET Exhibit. We’re both pretty huge Murray fans so we were excited to go. And as it happens, so were about a thousand other people. Rightly so. The event was held in The Library Project and housed prints of all shapes and styles from talented designers and artists, all of which of course were paying homage to Mr. Murray. 

During the exhibit, I spotted Sean Cummins‘ piece Lost in Tranglation. I loved everything about it. Its geometric structure and composition and form and stuff. It really captured Bill’s nonchalant attitude, but he also looked happy in it {some of the prints were a bit scary. Is that rude? I don’t mean it to be. But a small few were}. 

There were also Murray masks going around and I couldn’t resist picking one up for myself. It’s currently hanging up in our living room, but I’m waiting for an opportune moment to scare husband with it. I’m not sure how just yet. 

Sean’s print is originally in multiple shades of blue. I asked if it were possible to get a copy of the print in grey-scale. I know, that’s a pretty cheeky thing to ask for, but when I went to collect the print last week, there it was with the original copy. I’m really glad I got both the original blue as well as a grey scale copy, because you never know, one day soon I may redo the living room around blue. 

I reused an old charity shop frame I had and backed the print with some pink paper that was laying around. I think Bill pulls it off well. Down came the plummy painting {I was feeling a bit meh about it anyways}, and up went Bill. He now takes pride of place above our TV and is a pretty stellar addition to our living room. 
Thank you Sean, and your incredible work.

UPDATE: you too can order Sean’s Bill Murray print for your own home! Yay!

I love you to the Death Star and back

Today is a special day as it is husband’s birthday. He’s turning the ripe old age of 27. The same age I was when we got married. Yep, I’m a cradle robber. Represent. Anyways, I had a very special present in mind for him this year and I had it stored in my memory bank for some time …

Back in April my lovely friend Pat from In My Wheele House blogged a project she had done with a globe, some chalk + chalk paint and blew my mind by drawing the Death Star right onto that baby. I knew it would be a perfect home made present for husband. I found a globe in a charity shop, picked up some spray paint and I was on my way.

First I washed the globe, let it dry then I sprayed it with one coat of Iron Curtain grey paint – how very appropriate. Since it was plastic I went with spray paint to avoid peelage. And of course I went with my good old reliable Montana. I let it dry over night, and the next day I taped it off with washi tape. I used a thinner-than-usual black washi-style tape I got in IKEA. The reason I chose washi tape vs. masking tape is because it’s a lot more gentler when it comes to removing. 

I taped out a grid  of sorts {as seen above}, then sprayed with a darker shade of Montana paint {I cannot for the life of me remember its name right now}, peeled off the tape and again let it dry overnight. And please excuse my incredibly shoddy phone pic above. I was working sneakily in the spare bedroom at night – not the best for taking photos. 

The next day I used a Montana acrylic extra fine paint marker to draw in the details. I free-handed the wobbly and incredibly inaccurate lines and finer details, hoping it would closer resemble the Death Star. Yeah, I know it doesn’t look exactly like it, so if you’re a hardcore fan, please be gentle. If you squint your eyes at it from far away, it’s a dead ringer though. The perfect addition of nerd to our living room if I may be so bold.

It’s about to get sappy all up in here folks. You’ve been warned.

Happy birthday husband. You are the light of my life, always and forever. And as I wrote on your card, I love you to the Death Star and back.