Nannie’s knock-off Baileys

I’ve wanted to try this recipe of my grandmother’s for many years. It sat in my mom’s recipe book in the kitchen and whenever I came across it I’d always say to myself “I gotta make that one Christmas“. But then like, 10 years happened and still nothing.
This year I mentioned to my parents I’d like to give it a go and blog it. While we were in the kitchen stuffing our faces one day, my mom happened upon my Nannie Ada’s recipe and the next day I was buying the ingredients. I was a bit hesitant though because it didn’t seem like the ingredients would get along, but that didn’t stop me.
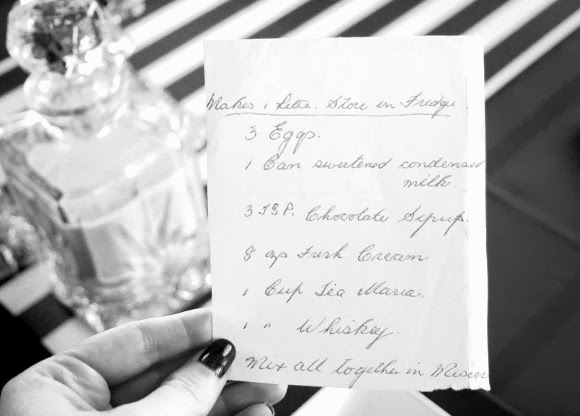
Ingredients
3 eggs
1 can sweetened condensed milk {
3 tsp chocolate syrup
8 oz fresh cream {roughly 230ml}
1 cup Tia Maria 
1 cup whiskey {we used Tullamore Dew}
Makes 1 litre
Method
Add all ingredients to a large jug and blend with a hand blender until mixed well. Just make sure you add the whiskey last. If you were to add it before the Tia Maria, it may cause the cream to split. Other than that, it’s painfully straight forward recipe. It took me all of about 3 minutes to make.
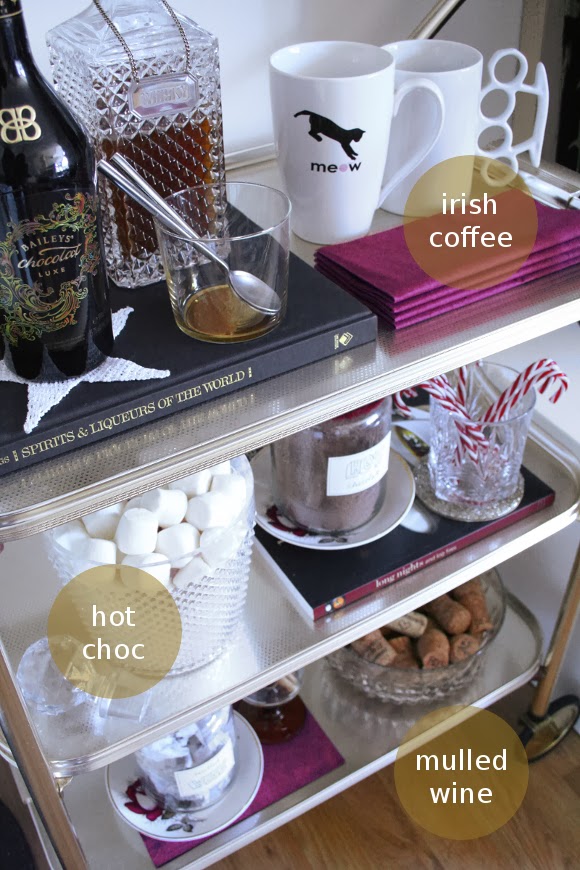
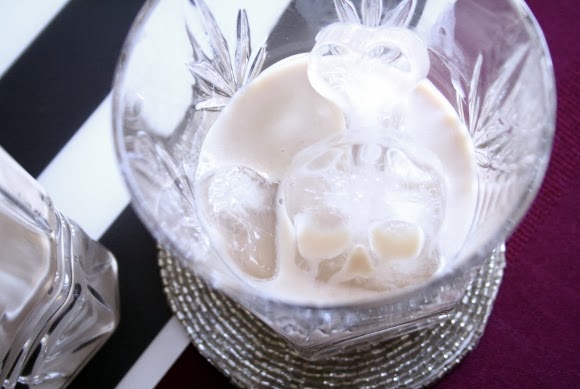
I think it is an absolute dead ringer for Baileys. Husband says it’s very close, but I think it’s because he knows I made it that there’s that bit of doubt there. It didn’t stop him from having 3 glasses of it last night … I’ve been keeping ours in a small decanter in the fridge to be on the safe side, and because it looks fancy too. You could of course pour it into an empty and clean Baileys bottle if you’d like to be extra crafty. Practice your sinister laugh as you hand your guests a glass. 
Best served over ice, ice, baby.

Being the persnickety shrewd that I am, I cracked out Excel and did the figures. Was it worth it? Will it be cheaper? Well, for 1 litre of knock-off Baileys it cost us €16.07. I was full of doubt. Until I found out the current price for 1 litre of Baileys is €26.83. A saving of €10+. Not bad … Bottoms up. 
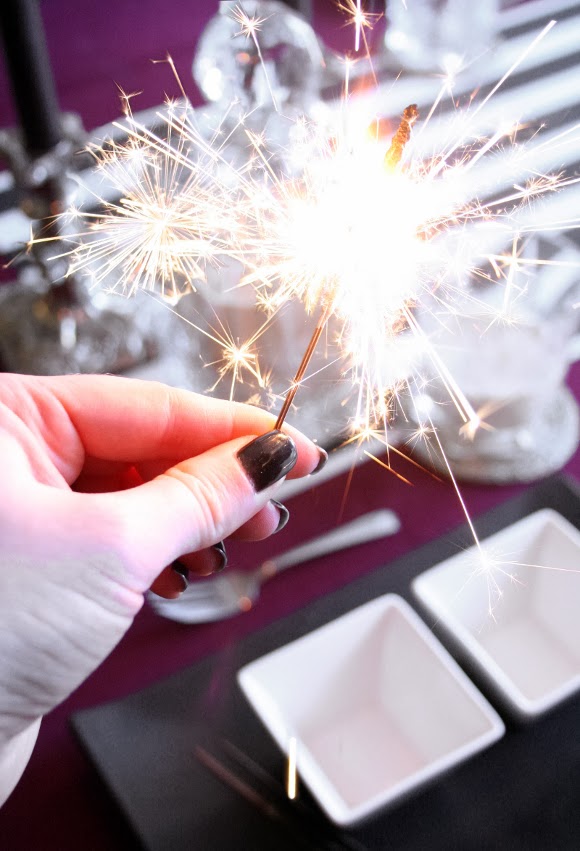
And of course, an early happy new year to you! Husband and I will be kicking it at home this year with le chats and up to our eyes in knock-off Baileys, sparklers, bubbly and MOAR food it seems. See you on the other side xx A

Christmas bar cart

Christmas officially arrived in full swing this week in our household and I couldn’t be happier. We prematurely decorated a couple of weeks ago for an exciting Christmas photo shoot {more on that soooon!}, but I knew if we kept the tree and decorations up that long, I’d end up getting tired of them. I love Christmas so much so I didn’t want to overdo it. So my lovely assistant husband tidied the {fully decorated} tree into our spare bedroom for a couple of weeks, and out she came on Sunday for reals.
As part of the photo shoot I had the idea to fancy up a Christmas themed bar cart. I redecorated it this week to cater to our 3 main Christmas drinks – Irish coffee, hot chocolate and mulled wine. Yes and please. I dedicated one shelf of our cart to each drink and decorated accordingly …

Husbands signature drink at Christmas is Irish coffee. He really hits the nail on the head. This year our household is rolling not one, but two Baileys deep. If you can, I would highly recommend the new Baileys Chocolat Luxe. I also included whiskey for old school Irish coffee, along with our favourite over-sized mugs ready to go. A perfect way to wind down at the end of a cold day.

The middle shelf is dedicated to hot chocolate. Mmmm. We splash out and go for Green & Black’s organic hot chocolate, which is well lush. Want to be a extra naughty? In stead of adding milk or cream to your mug of hot stuff, try a scoop of ice cream. Husband came up with that one last year, and it is heaven in your face. You will never be the same.

And last but not least, mulled wine. Husband was first introduced to mulled wine at my cousins wedding reception and loved it so much that 5 years later when we got married, we had a mulled wine reception. Every year when we decorate our Christmas tree, our tradition is to crack out a bottle of red to accompany our decorating. We do cheat and use those mulled wine tea bags with a couple extras {orange peel, brandy etc} when it’s just the two of us, but when we have guests, we go whole hog and make it from scratch. 
I couldn’t resist taking a picture of our cork collection while I was down there. Whenever we visit a new country or have a special occasion we always keep the cork, write on it and add it to our collection. There are a lot of special ones in there – our engagement cork, new years corks, our honeymoon in St. Petersburg, Russia, and ones with cheeky stories … 
So what are your favourite winter drinks? Are you old school like us, go for the usual beer or wine, or do you go for fancy cocktails? Eggnog is another one of my favourite Christmas drinks but a tier of eggs and cream wouldn’t really have looked very Christmassy on our cart. xx A

DIY – edible ornaments

I’m so excited today to share with you my first Christmas tutorial of the year – my cheeky spin on edible Christmas ornaments! Today’s tutorial is also part of Lupin’s Christmas tutorial link-up which is going down today and tomorrow. Today everyone involved blogs their tutorial, and tomorrow we share all of the things. More deets on that at the end of this post. 
My idea for today’s tutorial came from my stomach, if I’m being honest with you. I love Christmas treats, except I’m not partial to all the faff that comes with decorating them. I wanted to make something that had a simple enough template, was a little out of the ordinary, while also easily bespokable. Is that a word? Well it is now. Feast your eyes … 

I wanted a light and fresh recipe for my cookies that wasn’t too Christmassy. I stumbled upon a very easy cookie recipe on the BBC website which was perfect, and I added my own bit of zing; Husband is tore up from the floor up about lemon so I added the zest and juice of one lemon to the cookies and icing. I love citrus flavours around Christmas, especially to cut the heavy flavours that usually come with the season. Of course if you don’t like lemon, you can use whatever flavour you prefer, or you can play it safe and leave them plain … 
COOKIES 
100g unsalted butter
100g caster sugar
1 free range egg
275g plain flour
1tsp vanilla
Added pizzazz – the zest of one lemon
ICING
400g icing sugar
Added pizzazz – juice from one lemon
MARKERS
Edible markers in the colour of your choice. I used black and red which I bought from my local cake decorating store, Kitchen Compliments. On to the good stuff … 
Step 1 – cream together the butter, sugar, egg and vanilla. Slowly add the flour until the mixture resembles a dough. Flour your work surface and roll out your dough to roughly 1cm thick. Step 2 – using your cookie cutters of choice, cut out your cookies and place on your baking tray. To make a hole at the top of each cookie for the ribbon, just poke with a straw. Bake your cookies at 190C / 375F for 8-10 minutes. Remove from the oven and allow to cool.

Step 3 – when your cookies are cool {if you’re unsure, leave them for about an hour}, you can begin to apply the icing. You’ll want your icing to be the consistency of custard. If it’s too thick, it won’t level off and dry smoothly, and if it’s too soft, it’ll go all over the place, much like your blood pressure and we don’t want that. Step 4 – leave the icing to completely set. This means no touching for 2 days. TWO. DAYS. I know, I hear your pain. But if you don’t let the icing completely set, the icing will crack and bleed when you draw on your cookies and ain’t nobody wants that. Trust me, the 2 days pass a lot faster than you think. Tuck them out of site. 

Step 5 – when the icing has fully set, you can start drawing to your hearts content! String a piece of ribbon through the top of each cookie et voila! Hang them wherever you see fit – on your tree, kitchen cupboards, door handles, but I tend to leave them just within reach … You can make them as simple / complex, cheeky / politically correct as you like. 
I drew some of our favourite things onto our cookies; husband’s glasses, Alice in Wonderland references, our wedding vows ‘Always and Forever’ {which is a quote from Napoleon Dynamite}, black and white stripes, a movember moustache and this little guy, but unfortunately this little ‘trooper didn’t make it to the ribbon stage … 

These edible ornaments can be easily changed and adapted to whatever you want, so I hope today I’ve at least set off a couple of crafty light bulbs {I already have loads of ideas for my second batch!}. And the best part – you just shove them in your face whenever you want. Easy on clean up, and you don’t have to pack them away at the end of the season. Winning on all accounts I think. 
So that’s my little contribution to Lupin’s Christmas Linkup! Check back tomorrow Here’s my Christmas tutorial link-up blog post sharing all the tutorials made by everyone involved. A solid dose to get your Christmas brain juices flowing for the season ahead. Happy holidays! Nope, still too early. xx A