Street meat

Sundays Street Feast was a phenomenal hit. It was a great day and me and my man got to stuff our faces with delicate delights while getting to know our lovely neighbors, most of which we had never had the chance to bump into – an unfortunate occurrence in apartment blocks these days.
I woke up nice and early on Sunday morning and  made enough pastry for two tourtiere’s, blind baked them, made the filling for both pies, and baked them both. By the time I was finished, I was ready to eat them myself. It took a world of self control to not hack into them.

We were fortunate enough to meet two Canadians who were staying with neighbors on their holidays, and they were kindly able to accurately approve my tourtiere’s.

Since I had never made a tourtiere before, I was nervous. It’s been years since I had one, and I was worried I would ruin Canada’s rep in our community. But when it came to the moment of truth, those who tried it were pleasantly surprised. If you’d like to try this surprisingly straightforward recipe, all the important bits are blow. Great served hot for dinner, and leftovers kept for a picnic or lunch all week.

Additional note: my recipe has been amended to reflect a 100% true Canadien tourtiere. Thanks for the tips Emilie!

Ingredients
1/2lbs beef, cubed or minced/ground
1/2lbs pork, cubed or minced/ground
bacon to taste
2 potatoes, cubed
1 onion diced
salt and pepper to taste
1 recipe for double crust pastry – I found a good one here


Added to the pie from a previous recipe before being given the heads up on a true recipe
as much or as little garlic as you want
1/4 cup water
2tsp cornflour – to thicken if it gets a touch watery
1tsp sage – chopped fresh or dried
1tsp thyme – chopped fresh or dried
1/4tsp ground cloves

Method

Blind bake your pie base for 10 minutes. While that’s baking, combine all ingredients {except water and cornflour} in a pot and cook. Depending on how much fat is in the meat and how much liquids form in your filling, you may need to add the water, or add cornflour. Once the meat is cooked, serve into the semi-baked crust, place the uncooked pastry lid on top, pierce the top to let any hot air out, and cook in the oven at 180C for roughly 15-20 minutes – until the pastry on top is cooked. Cut, serve, stuff your face. 


I got my first recipe here and tweaked it where necessary, but was given an old school tourtiere recipe found here

Click here for a handy cooking calculator, should you prefer to measure in cups, mls, oz, etc.

Street Feast 2011

This Sunday the 28th of August is the annual Street Feast held all around Ireland. This event has been around for decades, where within any given community people get together outside to encourage openness within their neighborhood, to feel safer in your community, to reduce loneliness and isolation, to share your culinary passion {aka stuff your face}, and more importantly to get to know your neighbors – something unfortunately not a lot of us know.

I for one am hoping to make a couple of North American dishes – tourtiere, pumpkin pie or pecan pie. Robert would like us to serve the illusive and ever-tasty poutine, but since we wouldn’t be able to keep it hot we thought it would be best to give it a miss.

It’s not too late to organize a Street Feast of your own! Official, or unofficial, get out and get to know your neighbors. Break down those barriers and get your eat on.

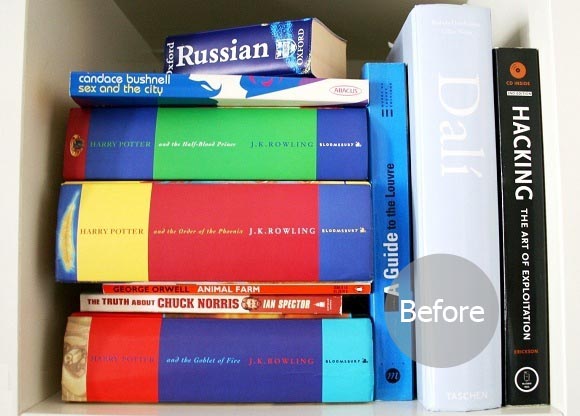
After and before – Deceptive dust covers

This isn’t a new project to me. I first came up with this  deceptive dust cover idea close to seven years ago when I lived with my folks: I had a shelf in my bedroom holding everything I held dear. I am a neat freak and color coordination is paramount, so some of those things I held dear weren’t exactly, how do I say, appealing to my corneas. I created faux dust covers to cover up unsightly books and cd’s that I loved.
I’d like to say I don’t judge a book by its cover, but if it’s too bright for my living room I will hide it behind other books. Dark moody colors appeal to me more than bright ones – to each his own. So I sat down and over the past week I made covers for the books I enjoy too much and were making me feel guilty for stuffing them at the back of my bookcase – but no longer. Below I’ve written a little tutorial on how to make your own dust covers should you like to revamp any books of your own.

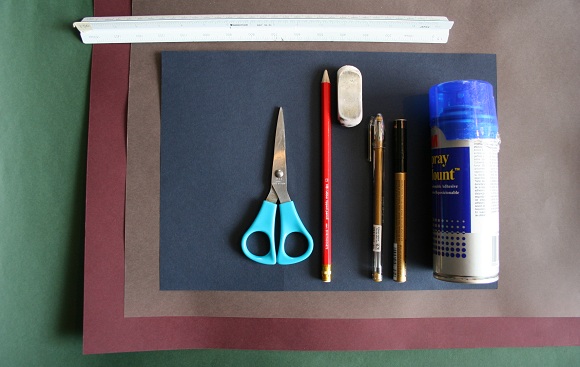
What you’ll need : enough heavy weighted craft paper {one up from construction paper} to cover your book{s}, ruler, scissors, pencil and eraser, thin gold pen, gold marker, and some form of adhesive – this is only used for adding another layer of paper to your cover – NOT to glue the dust cover to your book. We don’t want that. 

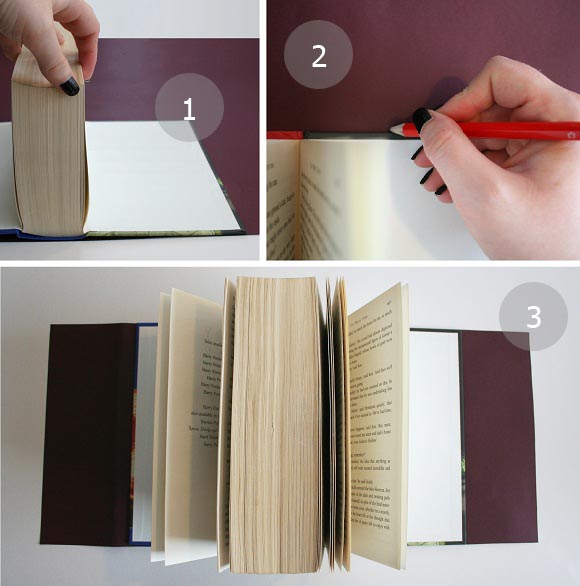
Step 1 : lay your book flat on the construction paper -completely flat- ensuring the spine is flat as well, otherwise you won’t get a truly accurate width of your book. Align with the bottom of the construction paper, this way you don’t have to cut out the entire shape of the book. Step 2 : on the construction paper, roughly mark the height of your book. Make sure to leave sufficient space on either side of the book to fold the side flaps (as seen in step 3). Step 3 : with a ruler, draw a lovely straight line for the top, and cut out. You will be left with a piece of paper the same height as your book, but wider on each side (above). 

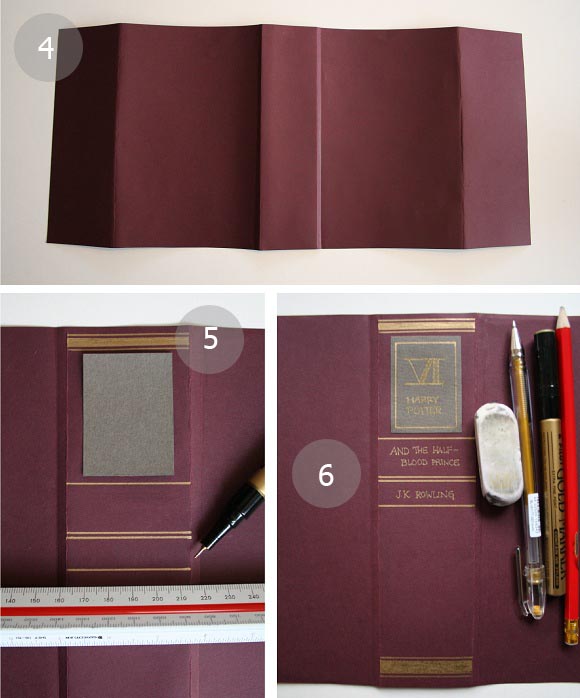
Step 4 : fold the construction paper template around the book cover. What I do next is put pressure along the edges to make sure the folds are defined, as well as use my finger nail to define the edge of the spine. Take the cover off, and you end up with this. Step 5 : using a ruler and your gold marker, draw a design down the spine of your cover. Here’s where your creativity comes in. I took inspiration from some of my favorite old books, alternatively you can find images of old books. I also cut out a little label for added charm. Step 6 : with your pencil, lightly mark where you will place the text. Once you’re happy with it, go over with the thin gold pen. Affix any labels if you choose, et voila, you’re finished!
I’ve mingled these books in with my little existing collection. I have a lot of black bound books already, so I didn’t make any for this project. I’m also working on revamping my book shelves. It doesn’t sound exciting, but it is to me. I’m considering some interesting alternatives … Happy crafting! 🙂