
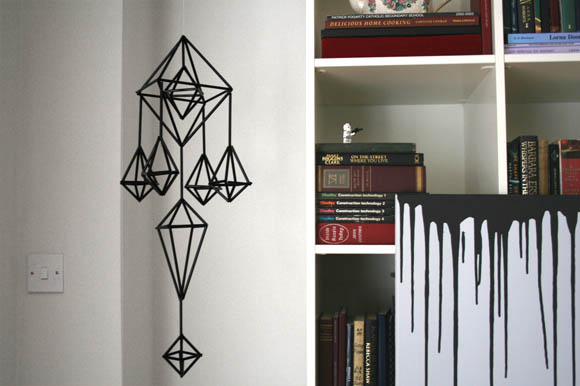

At long last, my himmeli is complete. What is himmeli, you ask? It is a traditional Swedish and Finish Christmas decoration made from natural straw {as opposed to plastic}, and is assembled in amazing and intricate patterns. Ever since I saw a feature on Design*Sponge all about himmeli, I had to have them. I fell for their contemporary and simple look, and I fell hard.
I managed to find a massive bag of straws for €2, meaning this particular himmeli cost me around … €0.40. They are shockingly easy to make, and once you get the hang of it, the sky -or ceiling- is your limit. Below are my seven steps to making your own himmeli. I hope you’re as excited as I am …
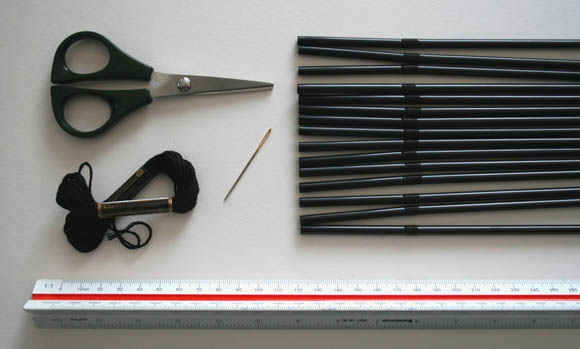
What you’ll need : scissors, embroidery thread {since it’s thicker than regular thread}, an embroidery needle, a ruler and an excessive amount of straws in any colour you like.
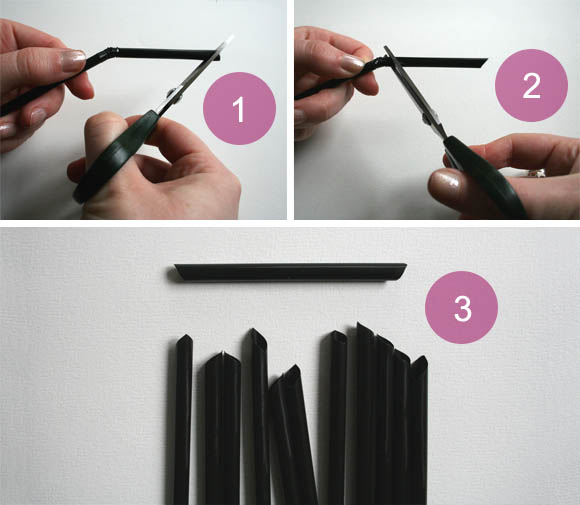
Step 1 : for my first himmeli, I used the top section of the straws. This saved me from having to measure each piece. ULTIMATE TIP – cut the ends of the straws at a 45 degree angle – when you assemble the himmeli, I’ve found the ends align in a much schnazzier way at this saucy angle. I had made some himmeli without cutting it at this angle, and the ends didn’t match up as well. Step 2 : when cutting the other end at a 45 degree angle, make sure you don’t twist your straw, otherwise it will be wonky. Step 3 : do this until you have 12 pieces, as a standard himmeli consists of 12 pieces.

Step 4 : thread your embroidery needle with a single piece of embroidery thread. Let the weight of the needle pass through the straw. Do this with four pieces of straw. At this point, tie a knot in the thread to close the loop, but don’t cut the thread. Knot it tight enough so the straws aren’t moving around on the string, but not so tight that the diamond shape doubles over. Step 5 : add two more pieces. Secure them {this can be done by simply looping the thread. No need to knot all the time} to the base, and add two more straws to the other side. Knot the thread here. Step 6 : in order to add the horizontal structure, pass the embroidery needle back down through one straw. From here, add one straw at a time, tightly looping around the vertical joints after each piece.

Step 7 : once you’ve added all four horizontal straws, tie off with a knot or two, trim any extra bits of embroidery thread, and there you have it! You just need a shit-ton more of these to complete a full himmeli, simply repeat the process. At this point you may feel a heaviness in your chest, but trust me, all the fiddley effort is worth it. As stupid and poetic as it sounds, seeing my full himmeli quietly turning in the corner of my living room is pretty rewarding. I just want to make more. And make them B I G G E R. And crazier.
Consider playing with different lengths of straws to give oblong shapes, also mixing brightly coloured straws {if you’re not a colour-phobe like me} for cute rainbow infused mobiles. I’m hoping to tackle different shapes and styles after I get a little more practice. Now get up and make something wonderful to cheer up that dingy corner, that everyone will compliment you on! Go on. You’re so crafty.
This is amazing!! Thank you for the surprisingly simple tutorial. And I like that you cut them at an angle….Very unlike the other tutorials. Thank you! 😉
S.A.
No problem, Sam 🙂
These are beautiful! I have seen pictures of the straw himmeli but straws offer such an easy and inexpensive alternative. Thanks for the great tutorial!
You're welcome! I've been meaning to make more – thanks for the reminder 😉
Great Job!!! Looks really good!
But my finnish-teacher said it is definitely a finnish tradition deco.
Thanks for the heads up! I'll add Finish in there too 🙂
so many possibilities! Love it!
This is also a traditional Lithuanian ornament which was of course was made with straw. I learned to make these as a child 50+ years ago. My mother also made these as a child but growing up in Lithuania.
I never knew they were also a Lithuanian tradition! Thanks for letting me know , E2. You learn a new thing every day.
These look amazing! There are some great ideas here, love it!