

 This isn’t a new project to me. I first came up with this deceptive dust cover idea close to seven years ago when I lived with my folks: I had a shelf in my bedroom holding everything I held dear. I am a neat freak and color coordination is paramount, so some of those things I held dear weren’t exactly, how do I say, appealing to my corneas. I created faux dust covers to cover up unsightly books and cd’s that I loved.
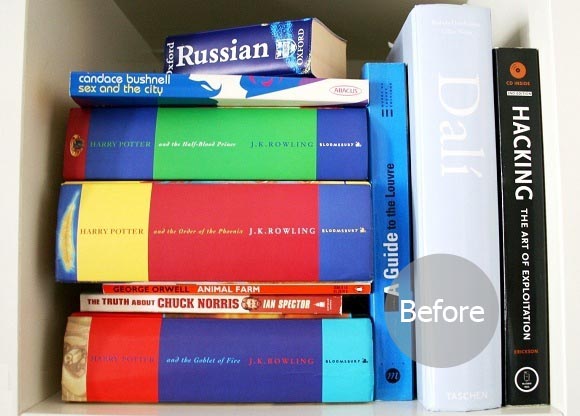
I’d like to say I don’t judge a book by its cover, but if it’s too bright for my living room I will hide it behind other books. Dark moody colors appeal to me more than bright ones – to each his own. So I sat down and over the past week I made covers for the books I enjoy too much and were making me feel guilty for stuffing them at the back of my bookcase – but no longer. Below I’ve written a little tutorial on how to make your own dust covers should you like to revamp any books of your own.
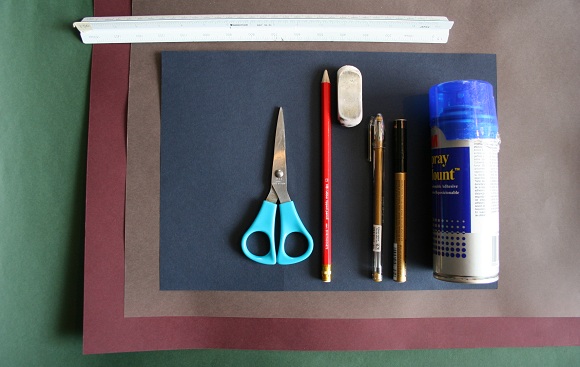
What you’ll need : enough heavy weighted craft paper {one up from construction paper} to cover your book{s}, ruler, scissors, pencil and eraser, thin gold pen, gold marker, and some form of adhesive – this is only used for adding another layer of paper to your cover – NOT to glue the dust cover to your book. We don’t want that.
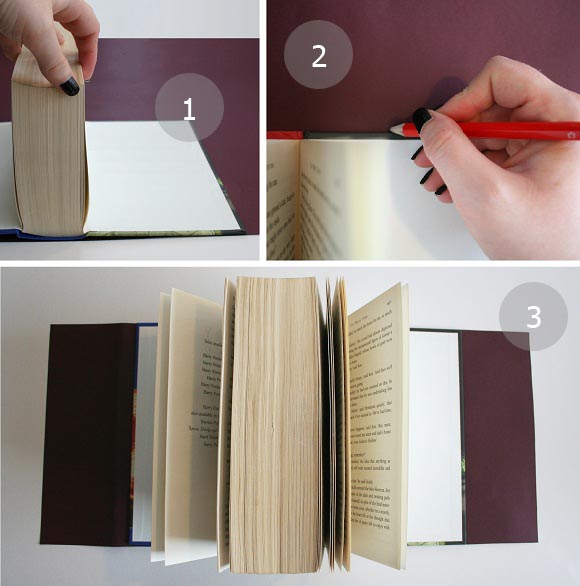
Step 1 : lay your book flat on the construction paper -completely flat- ensuring the spine is flat as well, otherwise you won’t get a truly accurate width of your book. Align with the bottom of the construction paper, this way you don’t have to cut out the entire shape of the book. Step 2 : on the construction paper, roughly mark the height of your book. Make sure to leave sufficient space on either side of the book to fold the side flaps (as seen in step 3). Step 3 : with a ruler, draw a lovely straight line for the top, and cut out. You will be left with a piece of paper the same height as your book, but wider on each side (above).
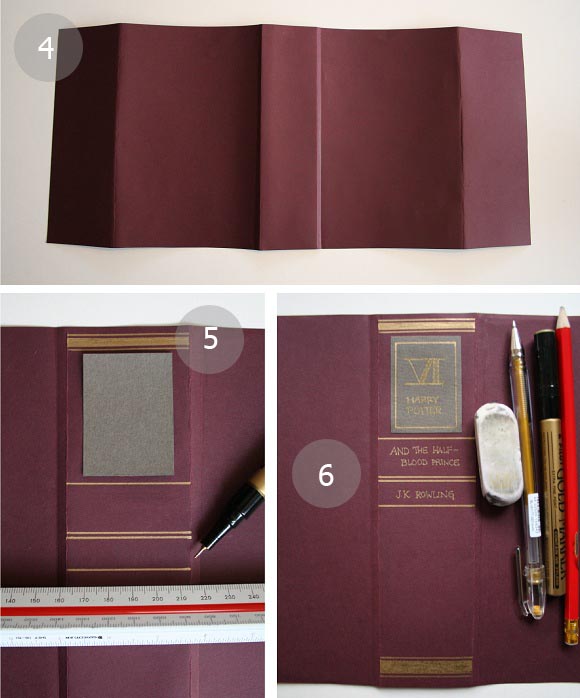
Step 4 : fold the construction paper template around the book cover. What I do next is put pressure along the edges to make sure the folds are defined, as well as use my finger nail to define the edge of the spine. Take the cover off, and you end up with this. Step 5 : using a ruler and your gold marker, draw a design down the spine of your cover. Here’s where your creativity comes in. I took inspiration from some of my favorite old books, alternatively you can find images of old books. I also cut out a little label for added charm. Step 6 : with your pencil, lightly mark where you will place the text. Once you’re happy with it, go over with the thin gold pen. Affix any labels if you choose, et voila, you’re finished!
I’ve mingled these books in with my little existing collection. I have a lot of black bound books already, so I didn’t make any for this project. I’m also working on revamping my book shelves. It doesn’t sound exciting, but it is to me. I’m considering some interesting alternatives … Happy crafting! 🙂
how cool!
Thank you Jan! 🙂
I agree with Jan. These are super cool! I love them.
You clever, tricky girl!
xo
amazing looks so easy but i bet there no way mine will turn out like this LOL
I always think I can copy something until i try it and it is always harder than it looks
girl you did a fabulous job !!!!!
That looks soooo cool! I'm sure that I could not do this, my handwriting is so very terrible, I could never achieve this "printed" look.
Love from Germany
Ursel
so clever. my brother will love it too.
LOVE
Thank you all for your such kind comments! I am utterly beyond flattered at the moment.
Dennice {Fringe} – I will pass that comment onto my mother. She aught to know.
Curtains In My Tree – you can make them as simple or as complex as you like! Put your mark on them and let your creativity run wild.
Die Rabenfrau – you should see the first text I wrote. Literally like a child with a crayon. It was plain awful!
Ludid – thank you! I was thinking of doing the same for my broseph, but for his PS3/Xbox games.
Once upon a Time – <3 <3 <3
What a great idea! And they turned out fantastic! I'll have to give these a try as I have a few favourite books that I'd love to display, but they're graced with unfortunately icky looking spines. Time to pretty them up!
Saw this on Pinterest and loved it! And now I find that you're the gal behind 'Meddling with Melodi'. Congratulations on completing your studies — I'm sure a career is waiting for you.
Barb_in_GA (similarly hydrangea obsessed, though I admit to sneaking sidelong glances at peonies)
Krissy – that's the exact reason I came up with this idea. It seems like a lengthy process, but I think it's worth it to be able to display my icky books.
Barb – you sound like a lady after my own heart: Hydrangeas. Yep, Meddling with Melodi was by me! And thank you for your well wishes – hopefully I'll be designing on a larger scale soon!
I love this idea! Its so cool looking!
Why thank you Kirsten!
Saw this on Pinterest–love it! Thanks for the tutorial.
Thank you Mrs. Scrimp! And thanks for stopping by 🙂
I included your dust covers in my Thrifty Inspiration post today. Thanks for such a great project!
http://thethriftyabode.blogspot.com/2011/09/thrifty-inspiration_16.html
Wow – thank you for sharing my project Aaron! And I think I'm going to HAVE to make that wreath 😉
Thanks!. You must put a traductor on your blog..kind regards!
Would you believe I was just thinking that this week? Done 🙂
I saw your DIY on Design Sponge…it's such a fantastic idea! Thank you for sharing it!
Lala
This is so great! Thank you very much! I will make covers for several books… up to now, I tend to hide Harry Potter away. Not because I was ashamed but because the books are so brightly coloured. =)
No problem Lala!
And Centi – try and figure out which HP book was used for my demonstration … Great minds.
Ohhhh!! I LOVE this! I have a TON of books that could use some spiffy new covers! Great ideas, as always 🙂
Thanks, Sarah :)))
Such a great idea! If you don't mind me asking, where did you find such large construction paper? I had some scrapbook paper and regular sized construction paper but they're too small for my books.
No probs, Karen. I got my paper from a book store here in Ireland called Easons. They sell large craft / presentation style paper – A1 size to be exact, that's 420 x 594cm. It's not construction paper, per say. It's smoother, thicker (that's what she said) and stronger than typical construction paper.
I hope that helps 🙂
This is a really brilliant idea! Thank you for sharing!
Thank you and no problem 🙂
Thanks, this was great! Love the colors you chose. I just reorganized my books for grad school, and some (from long ago) look really sad. Now I've got the perfect procrastination tool when I can't bear to look at my research. BTW, I love hydrangeas and adore wisteria.
Mariana
I'm glad you'll get use out of my tutorial Mariana 🙂 It's a really good project for a rainy day. And top choice on the flowers!
I am doing this although you know how big my brothers library was that I inherited so it will be a few years before I am finished lol. I truly love this idea!
I wish I knew who this was … Brother's library … Come on brain, don't fail me now …
I really want to do this!!!! I'm making my room look Sherlocky, and my books don't really fit in!! Perfect!