
I’m so excited today to share with you my first Christmas tutorial of the year – my cheeky spin on edible Christmas ornaments! Today’s tutorial is also part of Lupin’s Christmas tutorial link-up which is going down today and tomorrow. Today everyone involved blogs their tutorial, and tomorrow we share all of the things. More deets on that at the end of this post.
My idea for today’s tutorial came from my stomach, if I’m being honest with you. I love Christmas treats, except I’m not partial to all the faff that comes with decorating them. I wanted to make something that had a simple enough template, was a little out of the ordinary, while also easily bespokable. Is that a word? Well it is now. Feast your eyes …
I wanted a light and fresh recipe for my cookies that wasn’t too Christmassy. I stumbled upon a very easy cookie recipe on the BBC website which was perfect, and I added my own bit of zing; Husband is tore up from the floor up about lemon so I added the zest and juice of one lemon to the cookies and icing. I love citrus flavours around Christmas, especially to cut the heavy flavours that usually come with the season. Of course if you don’t like lemon, you can use whatever flavour you prefer, or you can play it safe and leave them plain …
COOKIES
100g unsalted butter
100g caster sugar
1 free range egg
275g plain flour
1tsp vanilla
Added pizzazz – the zest of one lemon
ICING
400g icing sugar
Added pizzazz – juice from one lemon
MARKERS
Edible markers in the colour of your choice. I used black and red which I bought from my local cake decorating store, Kitchen Compliments. On to the good stuff …
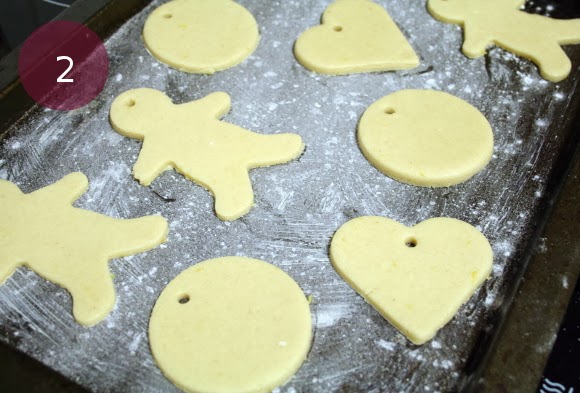
Step 1 – cream together the butter, sugar, egg and vanilla. Slowly add the flour until the mixture resembles a dough. Flour your work surface and roll out your dough to roughly 1cm thick. Step 2 – using your cookie cutters of choice, cut out your cookies and place on your baking tray. To make a hole at the top of each cookie for the ribbon, just poke with a straw. Bake your cookies at 190C / 375F for 8-10 minutes. Remove from the oven and allow to cool.
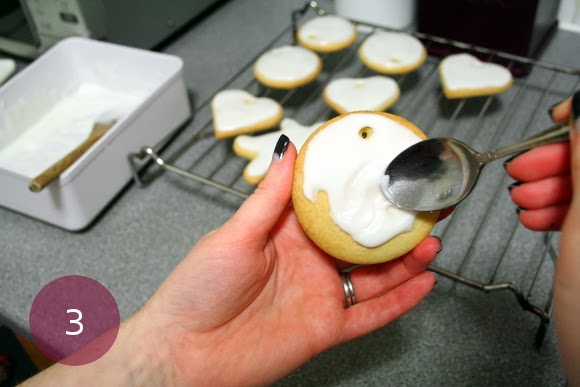
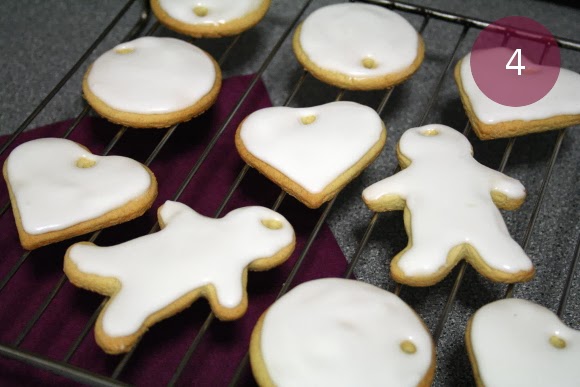
Step 3 – when your cookies are cool {if you’re unsure, leave them for about an hour}, you can begin to apply the icing. You’ll want your icing to be the consistency of custard. If it’s too thick, it won’t level off and dry smoothly, and if it’s too soft, it’ll go all over the place, much like your blood pressure and we don’t want that. Step 4 – leave the icing to completely set. This means no touching for 2 days. TWO. DAYS. I know, I hear your pain. But if you don’t let the icing completely set, the icing will crack and bleed when you draw on your cookies and ain’t nobody wants that. Trust me, the 2 days pass a lot faster than you think. Tuck them out of site.
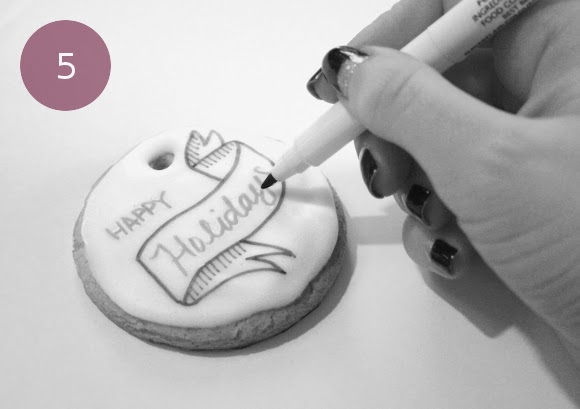
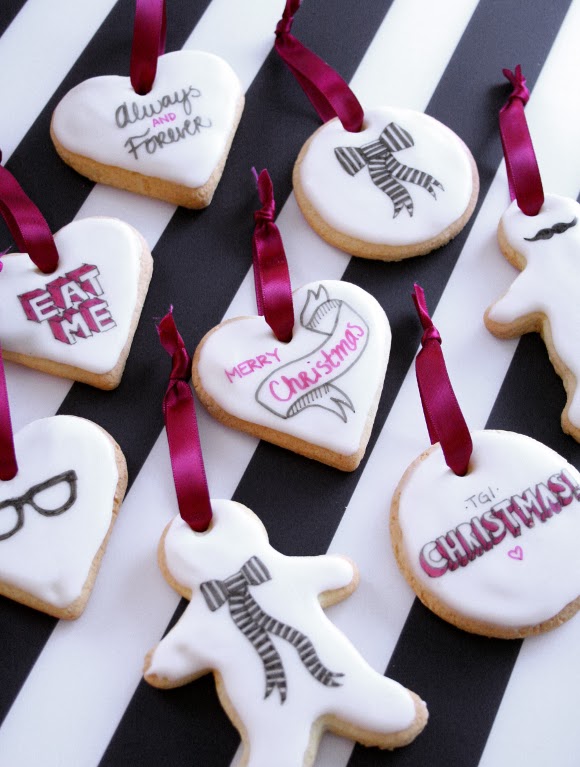
Step 5 – when the icing has fully set, you can start drawing to your hearts content! String a piece of ribbon through the top of each cookie et voila! Hang them wherever you see fit – on your tree, kitchen cupboards, door handles, but I tend to leave them just within reach … You can make them as simple / complex, cheeky / politically correct as you like.
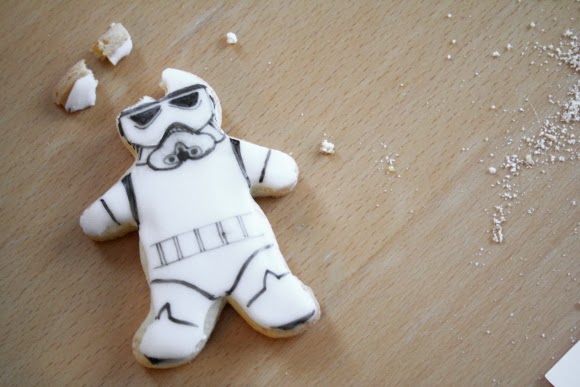
I drew some of our favourite things onto our cookies; husband’s glasses, Alice in Wonderland references, our wedding vows ‘Always and Forever’ {which is a quote from Napoleon Dynamite}, black and white stripes, a movember moustache and this little guy, but unfortunately this little ‘trooper didn’t make it to the ribbon stage …
These edible ornaments can be easily changed and adapted to whatever you want, so I hope today I’ve at least set off a couple of crafty light bulbs {I already have loads of ideas for my second batch!}. And the best part – you just shove them in your face whenever you want. Easy on clean up, and you don’t have to pack them away at the end of the season. Winning on all accounts I think.
So that’s my little contribution to Lupin’s Christmas Linkup! Check back tomorrow Here’s my Christmas tutorial link-up blog post sharing all the tutorials made by everyone involved. A solid dose to get your Christmas brain juices flowing for the season ahead. Happy holidays! Nope, still too early. xx A

Oh no, poor Storm Trooper… he lost his head, literally ^_^
These cookies are phenomenal!!
Thanks Manu 🙂 xx A
These are gorgeous! Lumberjack likes the 'Eat Me' one best, and says that we had a similar experience to the storm trooper at the weekend with some gingerbread men we made. (Mine got broken as I tried to get them off the baking tray – and resulted in me losing my temper and Lumberjack had to take over!)
I can't decide on my favourite – I think the ones with the black and white stripy bows.
I might have to look for some edible markers!! I love that idea – I get fed up trying to decorate stuff, I just want to eat it!
Good work, co-contributor!! xx
I had the same problem with these cookies too! Only a couple stuck and broke, but it was enough to push me over the edge for a couple of minutes. But then I just ate the mangled ones and I was fine.
You'd be surprised what you can find if you go into your local cake decorating shop. I had handfulls of stuff, but left most of it back when I told myself you don't actually bake very often. Amazing stuff can be found in there! xx A
Loving these contemporary cookies! Great tutorial :o)
Cute tutorial… thank you for sharing!
Sara x
http://www.CraftsofTexture.com
Your storm trooper!!!!
LOVE.
K, fantastic post. I want to do this so bad.
Brills.
This is just gorgeous. I love how you take all the cheesy stuff out of Christmas, they look cute and modern. However I am not sure I would manage to draw on the cookies as well as you do, you style is brilliant. The gingerbread man with the striped bow tie is adorable.
These are definitely my kind of decoration – pretty and edible – yum yum. Of course they probably wouldn't last until Christmas day in our house!